Run the Federation
OpenFL currently offers two ways to set up and run experiments with a federation: the Director-based workflow and Aggregator-based workflow. The Director-based workflow introduces a new and more convenient way to set up a federation and brings “long-lived” components in a federation (“Director” and “Envoy”), while the Aggregator-based workflow is advised for scenarios where the workload needs to be verified prior to execution.
- Director-Based Workflow
Setup long-lived components to run many experiments in series. Recommended for FL research when many changes to model, dataloader, or hyperparameters are expected
- Aggregator-Based Workflow
Define an experiment and distribute it manually. All participants can verify model code and [FL plan](https://openfl.readthedocs.io/en/latest/running_the_federation.html#federated-learning-plan-fl-plan-settings) prior to execution. The federation is terminated when the experiment is finished
Director-Based Workflow
A director-based workflow uses long-lived components in a federation. These components continue to be available to distribute more experiments in the federation.
The Director is the central node of the federation. This component starts an Aggregator for each experiment, sends data to connected collaborator nodes, and provides updates on the status.
The Envoy runs on collaborator nodes connected to the Director. When the Director starts an experiment, the Envoy starts the Collaborator to train the global model.
The director-based workflow comprises the following roles and their tasks:
Follow the procedure in the director-based workflow to become familiar with the setup required and APIs provided for each role in the federation: Experiment manager (Data scientist), Director manager, and Collaborator manager.
Experiment manager (or Data scientist) is a person or group of people using OpenFL.
Director Manager is ML model creator’s representative controlling Director.
Collaborator manager is Data owner’s representative controlling Envoy.
Note
The Open Federated Learning (OpenFL) interactive Python API enables the Experiment manager (data scientists) to define and start a federated learning experiment from a single entry point: a Jupyter* notebook or a Python* script.
See Interactive Python API (Beta) for details.
An overview of this workflow is shown below.

Overview of the Director-Based Workflow
Director Manager: Set Up the Director
The Director manager sets up the Director, which is the central node of the federation.
OPTIONAL STEP: Plan Agreement
In order to carry out a secure federation, the Director must approve the FL Plan before starting the experiment. This check could be enforced with the use of the setting review_experiment: True in director config. Refer to director_config_review_exp.yaml file under PyTorch_Histology interactive API example.
After the Director approves the experiment, it starts the aggregator and sends the experiment archive to all the participanting Envoys for review.
On the other hand, if the Director rejects the experiment, the experiment is aborted right away, no aggregator is started and the Envoys don’t receive the experiment archive at all.
OPTIONAL STEP: Create PKI Certificates Using Step-CA
The use of mutual Transport Layer Security (mTLS) is recommended for deployments in untrusted environments to establish participant identity and to encrypt communication. You may either import certificates provided by your organization or generate certificates with the semi-automatic PKI provided by OpenFL.
STEP 1: Install Open Federated Learning (OpenFL)
Install OpenFL in a virtual Python* environment. See Install the Package for details.
STEP 2: Start the Director
Start the Director on a node with at least two open ports. See Long-Lived Components to learn more about the Director entity.
Create a Director workspace with a default config file.
fx director create-workspace -p path/to/director_workspace_dir
This workspace will contain received experiments and supplementary files (Director config file and certificates).
Modify the Director config file according to your federation setup.
The default config file contains the Director node FQDN, an open port, path of certificates, and
sample_shapeandtarget_shapefields with string representation of the unified data interface in the federation.
Start the Director.
If mTLS protection is not set up, run this command.
fx director start --disable-tls -c director_config.yamlIf you have a federation with PKI certificates, run this command.
fx director start -c director_config.yaml \
     -rc cert/root_ca.crt \
     -pk cert/priv.key \
     -oc cert/open.crt
Collaborator Manager: Set Up the Envoy
The Collaborator manager sets up the Envoys, which are long-lived components on collaborator nodes. When started, Envoys will try to connect to the Director. Envoys receive an experiment archive and provide access to local data.
OPTIONAL STEP: Plan Agreement
In order to carry out a secure federation, each of the Envoys must approve the experiment before it is started, after the Director’s approval. This check could be enforced with the use of the parameter review_experiment: True in envoy config. Refer to envoy_config_review_exp.yaml file under PyTorch_Histology interactive API example.
If any of the Envoys rejects the experiment, a set_experiment_failed request is sent to the Director to stop the aggregator.
OPTIONAL STEP: Sign PKI Certificates (Optional)
The use of mTLS is recommended for deployments in untrusted environments to establish participant identity and to encrypt communication. You may either import certificates provided by your organization or use the semi-automatic PKI certificate provided by OpenFL.
STEP 1: Install OpenFL
Install OpenFL in a Python*virtual environment. See Install the Package for details.
STEP 2: Start the Envoy
Create an Envoy workspace with a default config file and shard descriptor Python* script.
fx envoy create-workspace -p path/to/envoy_workspace_dirModify the Envoy config file and local shard descriptor template.
Provide the settings field with the arbitrary settings required to initialize the shard descriptor.
Complete the shard descriptor template field with the address of the local shard descriptor class.
Note
The shard descriptor is an object to provide a unified data interface for FL experiments. The shard descriptor implements
get_dataset()method as well as several additional methods to access sample shape, target shape, and shard description that may be used to identify participants during experiment definition and execution.get_dataset()method accepts the dataset_type (for instance train, validation, query, gallery) and returns an iterable object with samples and targets.User’s implementation of ShardDescriptor should be inherented from
openfl.interface.interactive_api.shard_descriptor.ShardDescriptor. It should implementget_dataset,sample_shapeandtarget_shapemethods to describe the way data samples and labels will be loaded from disk during training.Start the Envoy.
If mTLS protection is not set up, run this command.
ENVOY_NAME=envoy_example_name

fx envoy start \
    -n "$ENVOY_NAME" \
    --disable-tls \
    --envoy-config-path envoy_config.yaml \
    -dh director_fqdn \
    -dp port
If you have a federation with PKI certificates, run this command.
ENVOY_NAME=envoy_example_name

fx envoy start \
    -n "$ENVOY_NAME" \
    --envoy-config-path envoy_config.yaml \
    -dh director_fqdn \
    -dp port \
    -rc cert/root_ca.crt \
    -pk cert/"$ENVOY_NAME".key \
    -oc cert/"$ENVOY_NAME".crt
Experiment Manager: Describe an Experiment
The process of defining an experiment is decoupled from the process of establishing a federation. The Experiment manager (or data scientist) is able to prepare an experiment in a Python environment. Then the Experiment manager registers experiments into the federation using Interactive Python API (Beta) that is allow to communicate with the Director using a gRPC client.
Interactive Python API (Beta)
The Open Federated Learning (OpenFL) interactive Python API enables the Experiment manager (data scientists) to define and start a federated learning experiment from a single entry point: a Jupyter* notebook or a Python script.
Prerequisites
The Experiment manager requires the following:
- Python Intepreter
Create a virtual Python environment with packages required for conducting the experiment. The Python environment is replicated on collaborator nodes.
- A Local Experiment Workspace
Initialize a workspace by creating an empty directory and placing inside the workspace a Jupyter* notebook or a Python script.
Items in the workspace may include:
source code of objects imported into the notebook from local modules
local test data stored in a data directory
certificates stored in a cert directory
Note
- This workspace will be archived and transferred to collaborator nodes. Ensure only relevant source code or resources are stored in the workspace.
data and cert directories will not be included in the archive.
Define a Federated Learning Experiment
The definition process of a federated learning experiment uses the interactive Python API to set up several interface entities and experiment parameters.
The following are the interactive Python API to define an experiment:
Note
Each federation is bound to some Machine Learning problem in a sense that all collaborators dataset shards should allow to solve the same data science problem. For example object detection and semantic segmentation problems should be solved in different federations.
Federation API
The Federation entity is designed to be a bridge between a notebook and Director.
Import the Federation class from openfl package
from openfl.interface.interactive_api.federation import Federation
Initialize the Federation object with the Director node network address and encryption settings.
federation = Federation(
    client_id: str, director_node_fqdn: str, director_port: str
    tls: bool, cert_chain: str, api_cert: str, api_private_key: str)
Note
You may disable mTLS in trusted environments or enable mTLS by providing paths to the certificate chain of the API authority, aggregator certificate, and a private key.
Note
Methods available in the Federation API:
get_dummy_shard_descriptor: creates a dummy shard descriptor for debugging the experiment pipeline
get_shard_registry: returns information about the Envoys connected to the Director and their shard descriptors
Experiment API
The Experiment entity registers training-related objects, federated learning (FL) tasks, and settings.
Import the FLExperiment class from openfl package
from openfl.interface.interactive_api.experiment import FLExperiment
Initialize the experiment with the following parameters: a federation object and a unique experiment name.
fl_experiment = FLExperiment(federation: Federation, experiment_name: str)
Import these supplementary interface classes:
TaskInterface,DataInterface, andModelInterface.from openfl.interface.interactive_api.experiment import TaskInterface, DataInterface, ModelInterface
Register the Model and Optimizer ( ModelInterface )
Instantiate and initialize a model and optimizer in your preferred deep learning framework.
from openfl.interface.interactive_api.experiment import ModelInterface
MI = ModelInterface(model, optimizer, framework_plugin: str)
The initialized model and optimizer objects should be passed to the ModelInterface along with the path to correct Framework Adapter plugin inside the OpenFL package
or from local workspace.
Note
The OpenFL interactive API supports TensorFlow and PyTorch frameworks via existing plugins.
User can add support for other deep learning frameworks via the plugin interface and point to your implementation of a framework_plugin in ModelInterface.
Register FL Tasks ( TaskInterface )
An FL task accepts the following objects:
model- will be rebuilt with relevant weights for every task by TaskRunner
data_loader- data loader that will provide local data
device- a device to be used for execution on collaborator machines
optimizer(optional) - model optimizer; only for training tasks
Register an FL task and accompanying information.
TI = TaskInterface()

task_settings = {
    'batch_size': 32,
    'some_arg': 228,
}
@TI.add_kwargs(**task_settings)
@TI.register_fl_task(model='my_model', data_loader='train_loader',
        device='device', optimizer='my_Adam_opt')
def foo(my_model, train_loader, my_Adam_opt, device, batch_size, some_arg=356):
    # training or validation logic
...
FL tasks return a dictionary object with metrics: {metric name: metric value for this task}.
Note
The OpenFL interactive API currently allows registering only standalone functions defined in the main module or imported from other modules inside the workspace.
The TaskInterface class must be instantiated before you can use its methods to register FL tasks.
@TI.register_fl_task()needs tasks argument names formodel,data_loader,device, andoptimizer(optional) that constitute a task contract. This method adds the callable and the task contract to the task registry.
@TI.add_kwargs()should be used to set up arguments that are not included in the contract.
Register Federated Data Loader ( DataInterface )
A shard descriptor defines how to read and format the local data. Therefore, the data loader contains the batching and augmenting data logic, which are common for all collaborators.
Subclass DataInterface and implement the following methods.
class CustomDataLoader(DataInterface):
    def __init__(self, **kwargs):
        # Initialize superclass with kwargs: this array will be passed
        # to get_data_loader methods
        super().__init__(**kwargs)
        # Set up augmentation, save required parameters,
        # use it as you regular dataset class
        validation_fraction = kwargs.get('validation_fraction', 0.5)
        ...

    @property
    def shard_descriptor(self):
        return self._shard_descriptor

    @shard_descriptor.setter
    def shard_descriptor(self, shard_descriptor):
        self._shard_descriptor = shard_descriptor
        # You can implement data splitting logic here
        # Or update your data set according to local Shard Descriptor atributes if required

    def get_train_loader(self, **kwargs):
        # these are the same kwargs you provided to __init__,
        # But passed on a collaborator machine
        bs = kwargs.get('train_batch_size', 32)
        return foo_loader()

    # so on, see the full list of methods below
The following are shard descriptor setter and getter methods:
shard_descriptor(self, shard_descriptor)is called during the Collaborator initialization procedure with the local shard descriptor. Include in this method any logic that is triggered with the shard descriptor replacement.
get_train_loader(self, **kwargs)is called before the execution of training tasks. This method returns the outcome of the training task according to thedata_loadercontract argument. Thekwargsdict returns the same information that was provided during theDataInterfaceinitialization.
get_valid_loader(self, **kwargs)is called before the execution of validation tasks. This method returns the outcome of the validation task according to thedata_loadercontract argument. Thekwargsdict returns the same information that was provided during theDataInterfaceinitialization.
get_train_data_size(self)returns the number of samples in the local dataset for training. Use the information provided by the shard descriptor to determine how to split your training and validation tasks.
get_valid_data_size(self)returns the number of samples in the local dataset for validation.
Note
The User Dataset class should be instantiated to pass further to the Experiment object.
Dummy shard descriptor (or a custom local one) may be set up to test the augmentation or batching pipeline.
Keyword arguments used during initialization on the frontend node may be used during dataloaders construction on collaborator machines.
Start an FL Experiment
Use the Experiment API to prepare a workspace archive to transfer to the Director.
FLExperiment.start()Note
Instances of interface classes
(TaskInterface, DataInterface, ModelInterface)must be passed toFLExperiment.start()method along with other parameters.This method:
Compiles all provided settings to a Plan object. The Plan is the central place where all actors in federation look up their parameters.
Saves plan.yaml to the
planfolder inside the workspace.Serializes interface objects on the disk.
Prepares requirements.txt for remote Python environment setup.
Compresses the whole workspace to an archive.
Sends the experiment archive to the Director so it may distribute the archive across the federation and start the Aggregator.
FLExperiment start() Method Parameters
The following are parameters of the start() method in FLExperiment:
model_providerThis parameter is defined earlier by the
ModelInterfaceobject.task_keeperThis parameter is defined earlier by the
TaskInterfaceobject.data_loaderThis parameter is defined earlier by the
DataInterfaceobject.task_assignerThis parameter is optional. You can pass a Custom task assigner function.
rounds_to_trainThis parameter defines the number of aggregation rounds needed to be conducted before the experiment is considered finished.
delta_updatesThis parameter sets up the aggregation to use calculated gradients instead of model checkpoints.
opt_treatmentThis parameter defines the optimizer state treatment in the federation. The following are available values:
RESET: the optimizer state is initialized each round from noise
CONTINUE_LOCAL: the optimizer state will be reused locally by every collaborator
CONTINUE_GLOBAL: the optimizer’s state will be aggregated
device_assignment_policyThe following are available values:
CPU_ONLY: the
deviceparameter (which is a part of a task contract) that is passed to an FL task each round will be cpuCUDA_PREFFERED: the
deviceparameter will be cuda:{index} if CUDA devices are enabled in the Envoy config and cpu otherwise.
Observe the Experiment Execution
If the experiment was accepted by the Director, you can oversee its execution with the FLexperiment.stream_metrics() method. This method prints metrics from the FL tasks (and saves TensorBoard logs).
Get Experiment Status
You can get the current experiment status with the FLexperiment.get_experiment_status() method. The status could be pending, in progress, finished, rejected or failed.
Complete the Experiment
When the experiment has completed:
retrieve trained models in the native format using
FLexperiment.get_best_model()andFLexperiment.get_last_model().erase experiment artifacts from the Director with
FLexperiment.remove_experiment_data().
You may use the same federation object to report another experiment or even schedule several experiments that will be executed in series.
Custom task assigner function
OpenFL has an entity named Task Assigner, that responsible for aggregator task assigning to collaborators.
There are three default tasks that are used: train, locally_tuned_model_validate,
aggregated_model_validate.
When you register a train function and pass optimizer it generates a train task:
task_keeper = TaskInterface()


@task_keeper.register_fl_task(model='net_model', data_loader='train_loader',
                              device='device', optimizer='optimizer')
def train(net_model, train_loader, optimizer, device, loss_fn=cross_entropy, some_parameter=None):
    torch.manual_seed(0)
    ...
When you register a validate function, it generates two tasks: locally_tuned_model_validate and
aggregated_model_validate.
locally_tuned_model_validate is applied by collaborator to locally trained model,
aggregated_model_validate - to a globally aggregated model.
If there not a train task only aggregated_model_validate are generated.
Since 1.3 version it is possible to create a custom task assigner function to implement your own task assigning logic.
You can get registered task from task_keeper calling method get_registered_tasks:
tasks = task_keeper.get_registered_tasks()
And then implement your own assigner function:
def random_assigner(collaborators, round_number, **kwargs):
    """Assigning task groups randomly while ensuring target distribution"""
    import random
    random.shuffle(collaborators)
    collaborator_task_map = {}
    for idx, col in enumerate(collaborators):
        # select only 70% collaborators for training and validation, 30% for validation
        if (idx+1)/len(collaborators) <= 0.7:
            collaborator_task_map[col] = tasks.values()  # all three tasks
        else:
            collaborator_task_map[col] = [tasks['aggregated_model_validate']]
    return collaborator_task_map
- And then pass that function to fl_experiment start method:
fl_experiment.start(
    model_provider=model_interface,
    task_keeper=task_keeper,
    data_loader=fed_dataset,
    task_assigner=random_assigner,
    rounds_to_train=50,
    opt_treatment='CONTINUE_GLOBAL',
    device_assignment_policy='CUDA_PREFERRED'
)
It will be passed to assigner and tasks will be assigned to collaborators by using this function.
Another example. If you want only exclude some collaborators from experiment, you can define next assigner function:
def filter_assigner(collaborators, round_number, **kwargs):
    collaborator_task_map = {}
    exclude_collaborators = ['env_two', 'env_three']
    for collaborator_name in collaborators:
        if collaborator_name in exclude_collaborators:
            continue
        collaborator_task_map[collaborator_name] = [
            tasks['train'],
            tasks['locally_tuned_model_validate'],
            tasks['aggregated_model_validate']
        ]
    return collaborator_task_map
Also you can use static shard information to exclude any collaborators without cuda devices from training:
shard_registry = federation.get_shard_registry()
def filter_by_shard_registry_assigner(collaborators, round_number, **kwargs):
    collaborator_task_map = {}
    for collaborator in collaborators:
        col_status = shard_registry.get(collaborator)
        if not col_status or not col_status['is_online']:
            continue
        node_info = col_status['shard_info'].node_info
        # Assign train task if collaborator has GPU with total memory more that 8 GB
        if len(node_info.cuda_devices) > 0 and node_info.cuda_devices[0].memory_total > 8 * 1024**3:
            collaborator_task_map[collaborator] = [
                tasks['train'],
                tasks['locally_tuned_model_validate'],
                tasks['aggregated_model_validate'],
            ]
        else:
            collaborator_task_map[collaborator] = [
                tasks['aggregated_model_validate'],
            ]
    return collaborator_task_map
Assigner with additional validation round:
rounds_to_train = 3
total_rounds = rounds_to_train + 1 # use fl_experiment.start(..., rounds_to_train=total_rounds,...)

def assigner_with_last_round_validation(collaborators, round_number, **kwargs):
    collaborator_task_map = {}
    for collaborator in collaborators:
        if round_number == total_rounds - 1:
            collaborator_task_map[collaborator] = [
                tasks['aggregated_model_validate'],
            ]
        else:
            collaborator_task_map[collaborator] = [
                tasks['train'],
                tasks['locally_tuned_model_validate'],
                tasks['aggregated_model_validate']
            ]
    return collaborator_task_map
Aggregator-Based Workflow
An overview of this workflow is shown below.
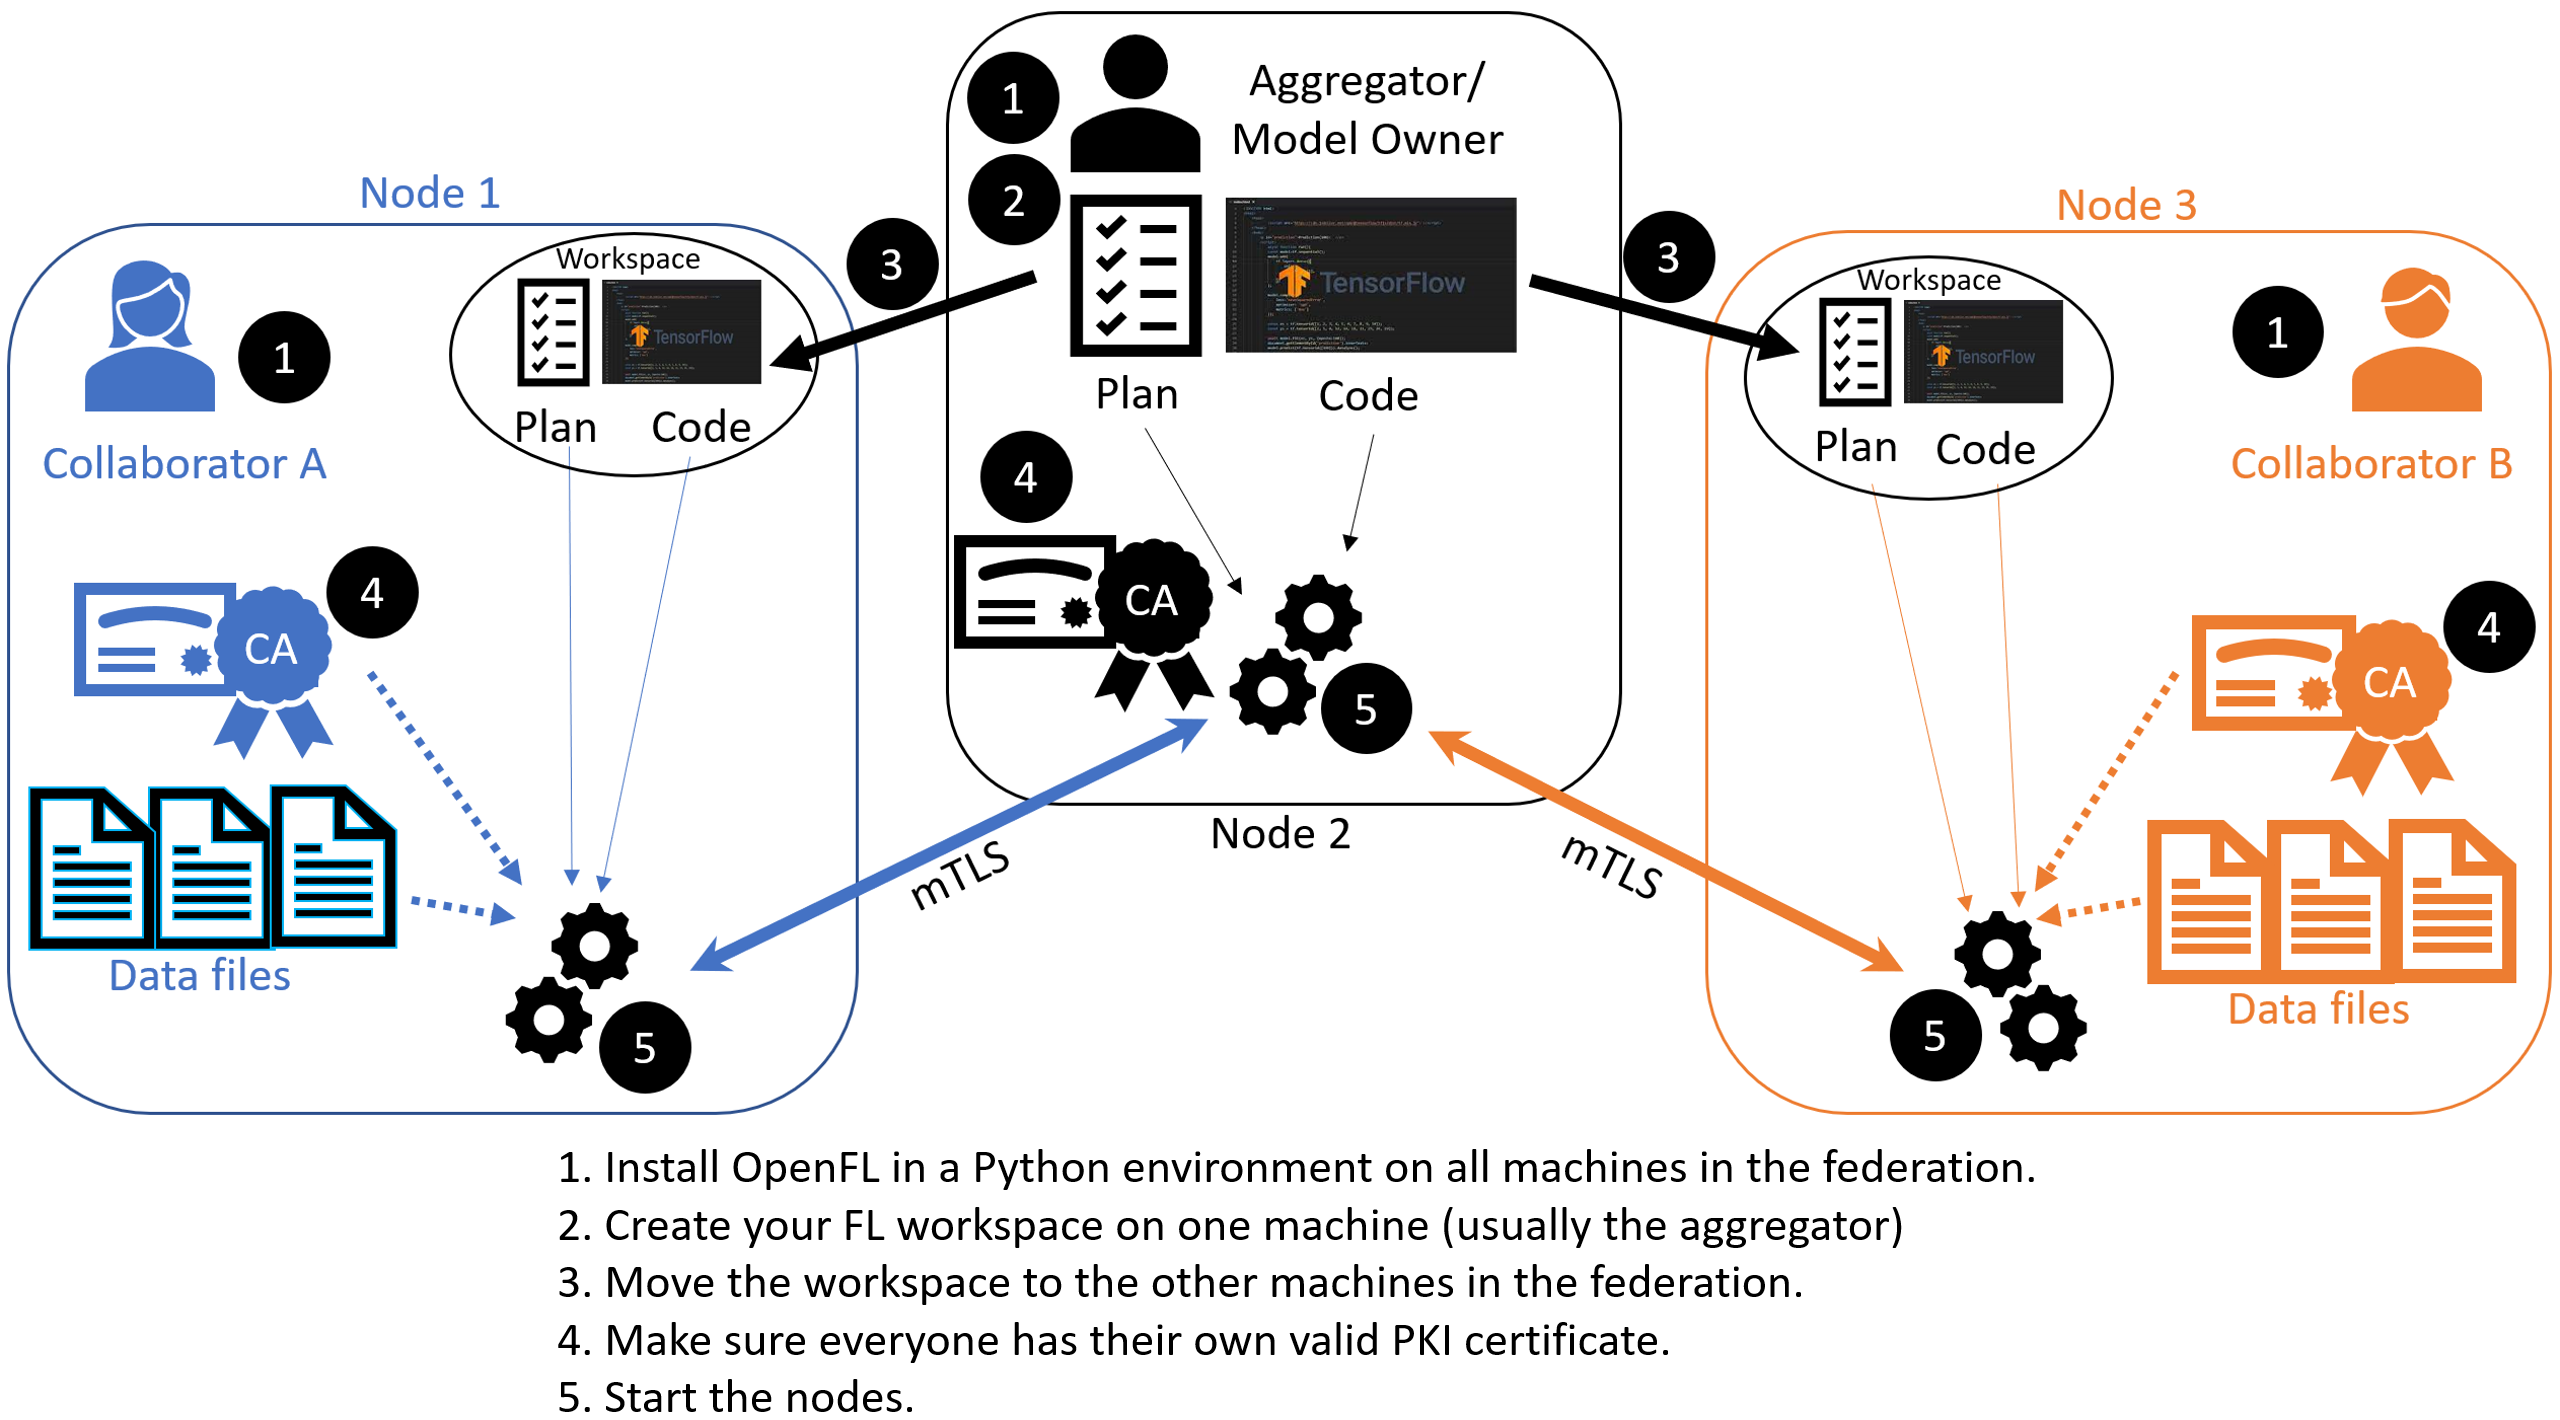
Overview of the Aggregator-Based Workflow
There are two ways to run federation without Director:
This workflow uses short-lived components in a federation, which is terminated when the experiment is finished. The components are as follows:
The Collaborator uses a local dataset to train a global model and the Aggregator receives model updates from Collaborators and aggregates them to create the new global model.
The Aggregator is framework-agnostic, while the Collaborator can use any deep learning frameworks, such as TensorFlow* or PyTorch*.
For this workflow, you modify the federation workspace to your requirements by editing the Federated Learning plan (FL plan) along with the Python* code that defines the model and the data loader. The FL plan is a YAML file that defines the collaborators, aggregator, connections, models, data, and any other parameters that describe the training.
Federated Learning Plan (FL Plan) Settings
Note
Use the Federated Learning plan (FL plan) to modify the federation workspace to your requirements in an aggregator-based workflow.
The FL plan is described by the plan.yaml file located in the plan directory of the workspace.
Each YAML top-level section contains the following subsections:
template: The name of the class including top-level packages names. An instance of this class is created when the plan gets initialized.settings: The arguments that are passed to the class constructor.defaults: The file that contains default settings for this subsection. Any setting from defaults file can be overridden in the plan.yaml file.
The following is an example of a plan.yaml:
# Copyright (C) 2020-2021 Intel Corporation
# Licensed subject to the terms of the separately executed evaluation license agreement between Intel Corporation and you.

aggregator :
  defaults : plan/defaults/aggregator.yaml
  template : openfl.component.Aggregator
  settings :
    init_state_path     : save/torch_cnn_mnist_init.pbuf
    best_state_path     : save/torch_cnn_mnist_best.pbuf
    last_state_path     : save/torch_cnn_mnist_last.pbuf
    rounds_to_train     : 10
    log_metric_callback :
      template : src.mnist_utils.write_metric


collaborator :
  defaults : plan/defaults/collaborator.yaml
  template : openfl.component.Collaborator
  settings :
    delta_updates    : false
    opt_treatment    : RESET

data_loader :
  defaults : plan/defaults/data_loader.yaml
  template : src.ptmnist_inmemory.PyTorchMNISTInMemory
  settings :
    collaborator_count : 2
    data_group_name    : mnist
    batch_size         : 256

task_runner :
  defaults : plan/defaults/task_runner.yaml
  template : src.pt_cnn.PyTorchCNN

network :
  defaults : plan/defaults/network.yaml

assigner :
  defaults : plan/defaults/assigner.yaml

tasks :
  defaults : plan/defaults/tasks_torch.yaml

compression_pipeline :
  defaults : plan/defaults/compression_pipeline.yaml
Configurable Settings
Aggregator
Collaborator
Data Loader
Task Runner
Assigner
Tasks
Each task subsection contains the following:
function: The function name to call. The function must be the one defined inTaskRunnerclass.kwargs: kwargs passed to thefunction.
Note
See an example of the TaskRunner class for details.
Bare Metal Approach
Note
Ensure you have installed the OpenFL package on every node (aggregator and collaborators) in the federation.
See Install the Package for details.
You can use the “Hello Federation” bash script to quickly create a federation (an aggregator node and two collaborator nodes) to test the project pipeline.
However, continue with the following procedure for details in creating a federation with an aggregator-based workflow.
`STEP 1: Create a Workspace on the Aggregator`_
Creates a federated learning workspace on one of the nodes.
STEP 2: Configure the Federation
Ensures each node in the federation has a valid public key infrastructure (PKI) certificate.
Distributes the workspace from the aggregator node to the other collaborator nodes.
STEP 1: Create a Workspace
Start a Python 3.8 (>=3.6, <3.11) virtual environment and confirm OpenFL is available.
fxThis example uses the
keras_cnn_mnisttemplate.Set the environment variables to use the
keras_cnn_mnistas the template and${HOME}/my_federationas the path to the workspace directory.
export WORKSPACE_TEMPLATE=keras_cnn_mnist
export WORKSPACE_PATH=${HOME}/my_federation
Decide a workspace template, which are end-to-end federated learning training demonstrations. The following is a sample of available templates:
keras_cnn_mnist: a workspace with a simple Keras CNN model that will download the MNIST dataset and train in a federation.
tf_2dunet: a workspace with a simple TensorFlow CNN model that will use the BraTS dataset and train in a federation.
tf_cnn_histology: a workspace with a simple TensorFlow CNN model that will download the Colorectal Histology dataset and train in a federation.
torch_cnn_histology: a workspace with a simple PyTorch CNN model that will download the Colorectal Histology dataset and train in a federation.
torch_cnn_mnist: a workspace with a simple PyTorch CNN model that will download the MNIST dataset and train in a federation.See the complete list of available templates.
fx workspace create --prefix ${WORKSPACE_PATH}
Create a workspace directory for the new federation project.
fx workspace create --prefix ${WORKSPACE_PATH} --template ${WORKSPACE_TEMPLATE}Note
You can use your own models by overwriting the Python scripts in the src subdirectory in the workspace directory.
Change to the workspace directory.
cd ${WORKSPACE_PATH}Install the workspace requirements:
pip install -r requirements.txtCreate an initial set of random model weights.
Note
While models can be trained from scratch, in many cases the federation performs fine-tuning of a previously trained model. For this reason, pre-trained weights for the model are stored in protobuf files on the aggregator node and passed to collaborator nodes during initialization.
The protobuf file with the initial weights is found in ${WORKSPACE_TEMPLATE}_init.pbuf.
fx plan initializeThis command initializes the FL plan and auto populates the fully qualified domain name (FQDN) of the aggregator node. This FQDN is embedded within the FL plan so the collaborator nodes know the address of the externally accessible aggregator server to connect to.
If you have connection issues with the auto populated FQDN in the FL plan, you can do one of the following:
OPTION 1: override the auto populated FQDN value with the
-aflag.fx plan initialize -a aggregator-hostname.internal-domain.comOPTION 2: override the apparent FQDN of the system by setting an FQDN environment variable.
export FQDN=x.x.x.xand initializing the FL plan
fx plan initialize
Note
Each workspace may have multiple FL plans and multiple collaborator lists associated with it. Therefore, fx plan initialize has the following optional parameters.
Optional Parameters |
Description |
|---|---|
-p, –plan_config PATH |
Federated Learning plan [default = plan/plan.yaml] |
-c, –cols_config PATH |
Authorized collaborator list [default = plan/cols.yaml] |
-d, –data_config PATH |
The data set/shard configuration file |
STEP 2: Configure the Federation
The objectives in this step:
Ensure each node in the federation has a valid public key infrastructure (PKI) certificate. See OpenFL Public Key Infrastructure (PKI) Solutions for details on available workflows.
Distribute the workspace from the aggregator node to the other collaborator nodes.
On the Aggregator Node:
Setting Up the Certificate Authority
Change to the path of your workspace:
cd WORKSPACE_PATHSet up the aggregator node as the certificate authority for the federation.
All certificates will be signed by the aggregator node. Follow the instructions and enter the information as prompted. The command will create a simple database file to keep track of all issued certificates.
fx workspace certify
Run the aggregator certificate creation command, replacing
AFQDNwith the actual fully qualified domain name (FQDN) for the aggregator node.fx aggregator generate-cert-request --fqdn AFQDNNote
On Linux*, you can discover the FQDN with this command:
hostname --all-fqdns | awk '{print $1}'Note
You can override the apparent FQDN of the system by setting an FQDN environment variable before creating the certificate.
fx aggregator generate-cert-request export FQDN=x.x.x.xIf you omit the
--fdqnparameter, thenfxwill automatically use the FQDN of the current node assuming the node has been correctly set with a static address.fx aggregator generate-cert-requestRun the aggregator certificate signing command, replacing
AFQDNwith the actual fully qualified domain name (FQDN) for the aggregator node.fx aggregator certify --fqdn AFQDNNote
You can override the apparent FQDN of the system by setting an FQDN environment variable (
export FQDN=x.x.x.x) before signing the certificate.fx aggregator certify export FQDN=x.x.x.xThis node now has a signed security certificate as the aggregator for this new federation. You should have the following files.
File Type
Filename
Certificate chain
WORKSPACE.PATH/cert/cert_chain.crt
Aggregator certificate
WORKSPACE.PATH/cert/server/agg_{AFQDN}.crt
Aggregator key
WORKSPACE.PATH/cert/server/agg_{AFQDN}.key
where AFQDN is the fully-qualified domain name of the aggregator node.
Exporting the Workspace
Export the workspace so that it can be imported to the collaborator nodes.
fx workspace exportThe
exportcommand will archive the current workspace (with azipfile extension) and create a requirements.txt of the current Python*packages in the virtual environment.The next step is to transfer this workspace archive to each collaborator node.
On the Collaborator Node:
Importing the Workspace
Copy the workspace archive from the aggregator node to the collaborator nodes.
Import the workspace archive.
fx workspace import --archive WORKSPACE.zip
where WORKSPACE.zip is the name of the workspace archive. This will unzip the workspace to the current directory and install the required Python packages within the current virtual environment.
For each test machine you want to run as collaborator nodes, create a collaborator certificate request to be signed by the certificate authority.
Replace
COL_LABELwith the label you assigned to the collaborator. This label does not have to be the FQDN; it can be any unique alphanumeric label.fx collaborator generate-cert-request -n {COL_LABEL}The creation script will also ask you to specify the path to the data. For this example, enter the integer that represents which MNIST shard to use on this collaborator node. For the first collaborator node enter 1. For the second collaborator node enter 2.
This will create the following files:
File Type
Filename
Collaborator CSR
WORKSPACE.PATH/cert/client/col_{COL_LABEL}.csr
Collaborator key
WORKSPACE.PATH/cert/client/col_{COL_LABEL}.key
Collaborator CSR Package
WORKSPACE.PATH/col_{COL_LABEL}_to_agg_cert_request.zip
On the aggregator node (i.e., the certificate authority in this example), sign the Collaborator CSR Package from the collaborator nodes.
fx collaborator certify --request-pkg /PATH/TO/col_{COL_LABEL}_to_agg_cert_request.zipwhere
/PATH/TO/col_{COL_LABEL}_to_agg_cert_request.zipis the path to the Collaborator CSR Package containing the.csrfile from the collaborator node. The certificate authority will sign this certificate for use in the federation.The command packages the signed collaborator certificate, along with the cert_chain.crt file needed to verify certificate signatures, for transport back to the collaborator node:
File Type
Filename
Certificate and Chain Package
WORKSPACE.PATH/agg_to_col_{COL_LABEL}_signed_cert.zip
On the collaborator node, import the signed certificate and certificate chain into your workspace.
fx collaborator certify --import /PATH/TO/agg_to_col_{COL_LABEL}_signed_cert.zip
STEP 3: Start the Federation
On the Aggregator Node:
Start the Aggregator.
fx aggregator start
Now, the Aggregator is running and waiting for Collaborators to connect.
On the Collaborator Nodes:
Open a new terminal, change the directory to the workspace, and activate the virtual environment.
Run the Collaborator.
fx collaborator start -n {COLLABORATOR_LABEL}where
COLLABORATOR_LABELis the label for this Collaborator.Note
Each workspace may have multiple FL plans and multiple collaborator lists associated with it. Therefore,
fx collaborator starthas the following optional parameters.Optional Parameters
Description
-p, –plan_config PATH
Federated Learning plan [default = plan/plan.yaml]
-d, –data_config PATH
The data set/shard configuration file
Repeat the earlier steps for each collaborator node in the federation.
When all of the Collaborators connect, the Aggregator starts training. You will see log messages describing the progress of the federated training.
When the last round of training is completed, the Aggregator stores the final weights in the protobuf file that was specified in the YAML file, which in this example is located at save/${WORKSPACE_TEMPLATE}_latest.pbuf.
Post Experiment
Experiment owners may access the final model in its native format. Among other training artifacts, the aggregator creates the last and best aggregated (highest validation score) model snapshots. One may convert a snapshot to the native format and save the model to disk by calling the following command from the workspace:
fx model save -i model_protobuf_path.pth -o save_model_path
In order for this command to succeed, the TaskRunner used in the experiment must implement a save_native() method.
Another way to access the trained model is by calling the API command directly from a Python script:
from openfl import get_model
model = get_model(plan_config, cols_config, data_config, model_protobuf_path)
In fact, the get_model() method returns a TaskRunner object loaded with the chosen model snapshot. Users may utilize the linked model as a regular Python object.
Docker Approach
There are two ways you can run OpenFL with Docker*.
Option 1: Deploy a Federation in a Docker Container
Note
You have to built an OpenFL image. See OpenFL with Docker* for details.
Run the OpenFL image.
docker run -it --network host openfl
You can now experiment with OpenFL in the container. For example, you can test the project pipeline with the “Hello Federation” bash script.
Option 2: Deploy Your Workspace in a Docker Container
Note
You have to set up a TaskRunner and run fx plan initialize in the workspace directory. See `STEP 1: Create a Workspace on the Aggregator`_ for details.
Build an image with the workspace you created.
fx workspace dockerizeBy default, the image is saved as WORKSPACE_NAME_image.tar in the workspace directory.
The image can be distributed and run on other nodes without any environment preparation.
docker run -it --rm \
    --network host \
    -v user_data_folder:/home/user/workspace/data \
    ${WORKSPACE_IMAGE_NAME} \
    bash
Note
The FL plan should be initialized with the FQDN of the node where the aggregator container will be running.
Generate public key infrastructure (PKI) certificates for all collaborators and the aggregator. See OpenFL Public Key Infrastructure (PKI) Solutions for details.