Federated Learning using GaNDLF#
This guide will show you how to take an existing model using the Generally Nuanced Deep Learning Framework (GaNDLF) experiment to a federated environment.
- `Aggregator-Based Workflow`_
Define an experiment and distribute it manually. All participants can verify model code and FL plan prior to executing the code/model. The federation is terminated when the experiment is finished, and appropriate statistics are generated.
TaskRunner API#
An overview of this workflow is shown below.
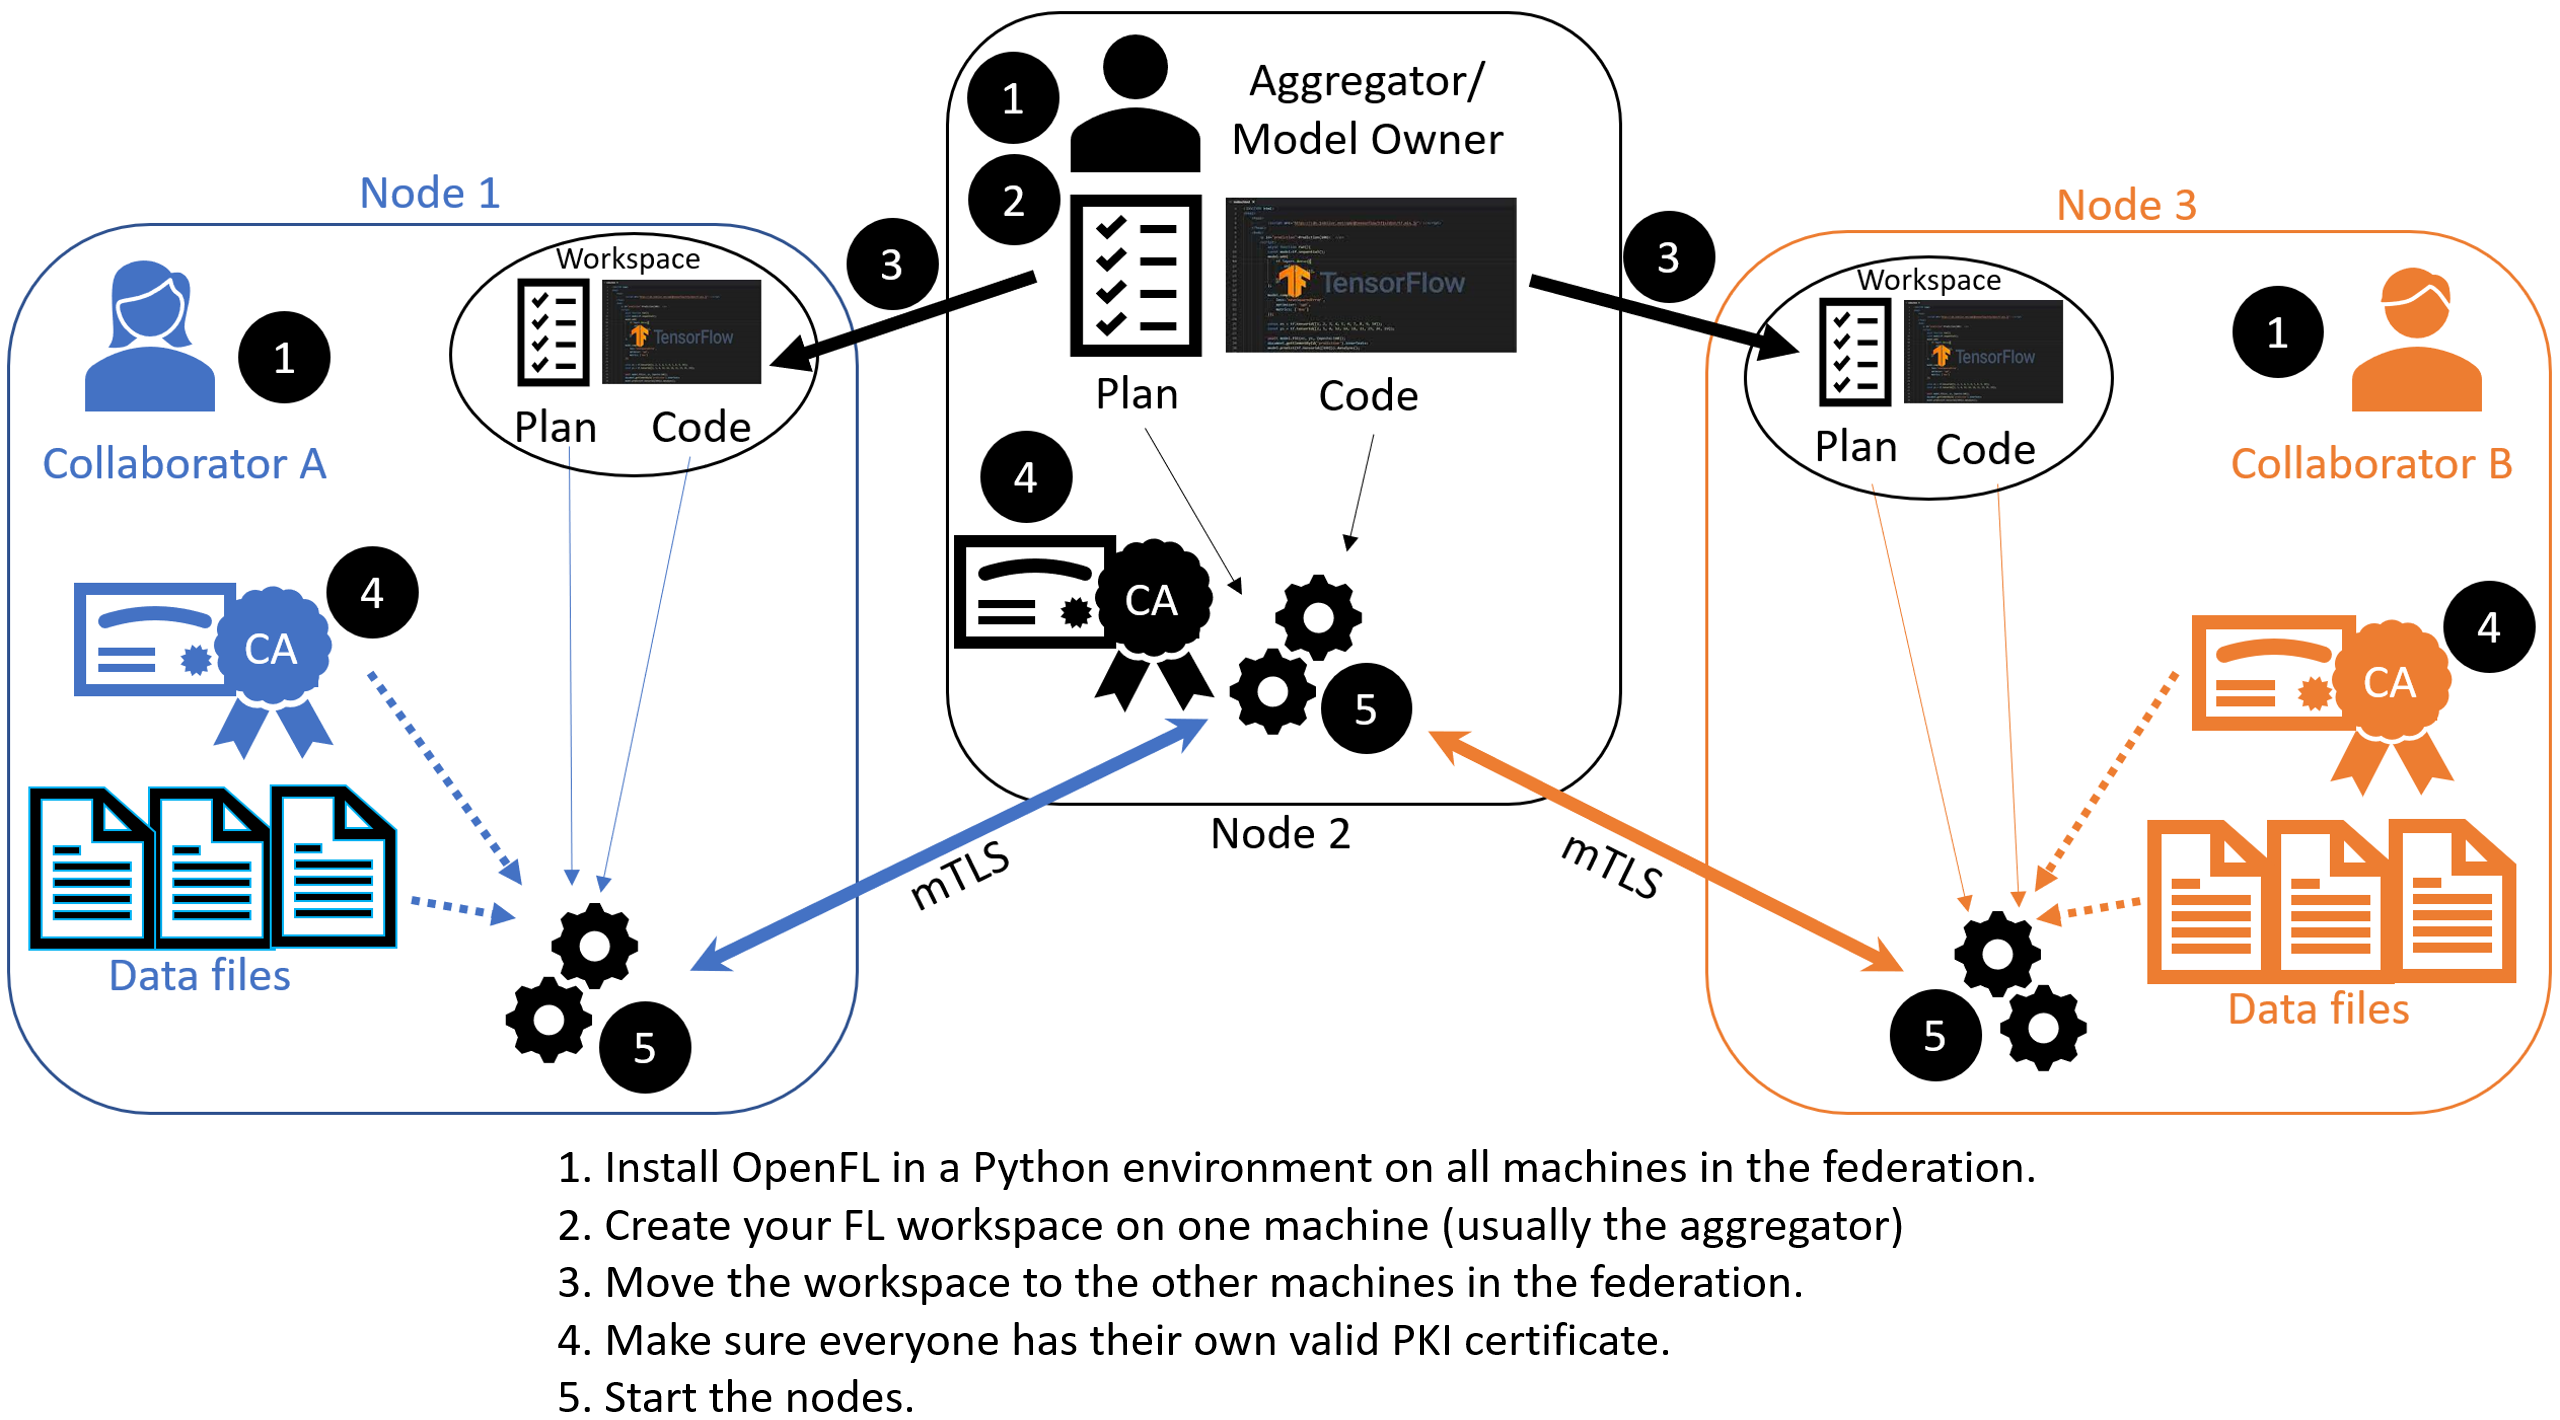
Overview of the TaskRunner API
This method uses short-lived components in a federation, which is terminated when the experiment is finished. The components are as follows:
The Collaborator uses a local dataset to train a global model and sends the model updates to the Aggregator, which aggregates them to create the new global model.
The Aggregator is framework-agnostic, while the Collaborator can use any deep learning frameworks, such as TensorFlow* or PyTorch*. GaNDLF provides a straightforward way to define complete model training pipelines for healthcare data, and is directly compatible with OpenFL.
This guide will demonstrate how to take an existing GaNDLF model configuration (e.g., for segmentation), embed this within the Federated Learning plan (FL plan) along with the Python* code that defines the model and the data loader. The FL plan is a YAML file that defines the collaborators, aggregator, connections, models, data, and any other parameters that describe the training.
Configurable Settings#
Tasks#
Each task subsection contains the following:
function: The function name to call. The function must be the one defined inTaskRunnerclass.kwargs: kwargs passed to thefunction.
Note
See an example of the TaskRunner class for details.
Simulate a federation#
Note
Ensure you have installed the OpenFL package on every node (aggregator and collaborators) in the federation.
See Installation for details.
You can use the “Hello Federation” bash script to quickly create a federation (an aggregator node and two collaborator nodes) to test the project pipeline.
# Copyright (C) 2020-2023 Intel Corporation
# SPDX-License-Identifier: Apache-2.0

import os
import time
import argparse
from pathlib import Path
from subprocess import check_call
from concurrent.futures import ProcessPoolExecutor

from openfl.utilities.utils import rmtree
from tests.github.utils import create_collaborator, create_certified_workspace, certify_aggregator, is_path_name_allowed
from openfl.utilities.utils import getfqdn_env


def main():
    # Test the pipeline
    parser = argparse.ArgumentParser()
    workspace_choice = []
    excluded_dirs = ['workspace', 'default', "experimental"]
    for root, _, files in os.walk('openfl-workspace'):
        if any(file.endswith(".workspace") for file in files):
            dir_path = os.path.relpath(root, 'openfl-workspace')
            dir_path = dir_path.replace(os.sep, '/')
            if dir_path and not any(dir_path.startswith(prefix) for prefix in excluded_dirs):
                workspace_choice.append(dir_path)
    parser.add_argument('--template', default='keras/mnist', choices=workspace_choice)
    parser.add_argument('--fed_workspace', default='fed_work12345alpha81671')
    parser.add_argument('--col1', default='one123dragons')
    parser.add_argument('--col2', default='beta34unicorns')
    parser.add_argument('--rounds-to-train')
    parser.add_argument('--col1-data-path', default='1')
    parser.add_argument('--col2-data-path', default='2')
    parser.add_argument('--save-model')
    parser.add_argument('--transport-protocol', default='grpc', help='Transport protocol for communication')

    origin_dir = Path.cwd().resolve()
    args = parser.parse_args()
    fed_workspace = args.fed_workspace

    # Check if the path name is allowed before creating the workspace
    if not is_path_name_allowed(fed_workspace):
        print(f"The path name {fed_workspace} is not allowed")
        return

    archive_name = f'{fed_workspace}.zip'
    fqdn = getfqdn_env()
    template = args.template
    rounds_to_train = args.rounds_to_train
    col1, col2 = args.col1, args.col2
    col1_data_path, col2_data_path = args.col1_data_path, args.col2_data_path
    save_model = args.save_model
    transport_protocol = args.transport_protocol
    if transport_protocol not in ['grpc', 'rest']:  # Updated to include 'rest' as a valid option
        raise ValueError(f"Invalid transport protocol: {transport_protocol}. Use 'grpc' or 'rest'.")

    # START
    # =====
    # Make sure you are in a Python virtual environment with the FL package installed.
    create_certified_workspace(fed_workspace, template, fqdn, rounds_to_train, transport_protocol)
    certify_aggregator(fqdn)

    workspace_root = Path().resolve()  # Get the absolute directory path for the workspace

    # Create collaborator #1
    create_collaborator(col1, workspace_root, col1_data_path, archive_name, fed_workspace)

    # Create collaborator #2
    create_collaborator(col2, workspace_root, col2_data_path, archive_name, fed_workspace)

    # Run the federation
    with ProcessPoolExecutor(max_workers=3) as executor:
        executor.submit(check_call, ['fx', 'aggregator', 'start'], cwd=workspace_root)
        time.sleep(5)

        dir1 = workspace_root / col1 / fed_workspace
        executor.submit(check_call, ['fx', 'collaborator', 'start', '-n', col1], cwd=dir1)
        # add sleep for 10s as the collaborator needs time to download the data
        time.sleep(10)
        dir2 = workspace_root / col2 / fed_workspace
        executor.submit(check_call, ['fx', 'collaborator', 'start', '-n', col2], cwd=dir2)

    # Convert model to native format
    if save_model:
        check_call(
            ['fx', 'model', 'save', '-i', f'./save/last.pbuf', '-o', save_model],
            cwd=workspace_root)

    os.chdir(origin_dir)
    rmtree(workspace_root)


if __name__ == '__main__':
    main()
However, continue with the following procedure for details in creating a federation with an aggregator-based workflow.
STEP 1: Install GaNDLF prerequisites and Create a Workspace
Creates a federated learning workspace on one of the nodes.
STEP 2: Configure the Federation
Ensures each node in the federation has a valid public key infrastructure (PKI) certificate.
Distributes the workspace from the aggregator node to the other collaborator nodes.
STEP 1: Install GaNDLF prerequisites and Create a Workspace#
Start a Python 3.10 (>=3.10, <3.13) virtual environment and confirm OpenFL is available.
fxInstall GaNDLF from sources (if not already).
Create GaNDLF’s Data CSVs. The example below is for 3D Segmentation using the unit test data:
$ python -c "from testing.test_full import test_generic_download_data, test_generic_constructTrainingCSV; test_generic_download_data(); test_generic_constructTrainingCSV()"
# Creates training CSV
$ head -n 8 testing/data/train_3d_rad_segmentation.csv > train.csv
$ head -n 1 testing/data/train_3d_rad_segmentation.csv > val.csv
# Creates validation CSV
$ tail -n +9 testing/data/train_3d_rad_segmentation.csv >> val.csv
Note
This step creates sample data CSVs for this tutorial. In a real federation, you should bring your own Data CSV files from GaNDLF that reflect the data present on your system
Use the
gandlf_seg_testtemplateSet the environment variables to use the
gandlf_seg_testas the template and${HOME}/my_federationas the path to the workspace directory.
$ export WORKSPACE_TEMPLATE=gandlf_seg_test
$ export WORKSPACE_PATH=${HOME}/my_federation
Create a workspace directory for the new federation project.
$ fx workspace create --prefix ${WORKSPACE_PATH} --template ${WORKSPACE_TEMPLATE}
Change to the workspace directory.
$ cd ${WORKSPACE_PATH}
Copy the GaNDLF Data CSVs into the default path for model initialization
# 'one' is the default name of the first collaborator in `plan/data.yaml`.
$ mkdir -p data/one
$ cp ~/GaNDLF/train.csv data/one
$ cp ~/GaNDLF/val.csv data/one
Create the FL plan and initialize the model weights.
This step will initialize the federated learning plan and initialize the random model weights that will be used by all collaborators at the start of the expeirment.
$ fx plan initialize
Alternatively, to use your own GaNDLF configuration file, you can import it into the plan with the following command:
$ fx plan initialize --gandlf_config ${PATH_TO_GANDLF_CONFIG}.yaml
The FL plan is described by the plan.yaml file located in the plan directory of the workspace. OpenFL aims to make it as easy as possible to take an existing GaNDLF experiment and make it run across a federation.
Each YAML top-level section contains the following subsections:
template: The name of the class including top-level packages names. An instance of this class is created when the plan gets initialized.settings: The arguments that are passed to the class constructor.defaults: The file that contains default settings for this subsection. Any setting from defaults file can be overridden in the plan.yaml file.
The following is an example of the GaNDLF Segmentation Test plan.yaml. Notice the task_runner/settings/gandlf_config block where the GaNDLF configuration file is embedded:
# Copyright (C) 2022 Intel Corporation
# Licensed subject to the terms of the separately executed evaluation license agreement between Intel Corporation and you.

aggregator :
  defaults : plan/defaults/aggregator.yaml
  template : openfl.component.Aggregator
  settings :
    init_state_path : save/fets_seg_test_init.pbuf
    best_state_path : save/fets_seg_test_best.pbuf
    last_state_path : save/fets_seg_test_last.pbuf
    rounds_to_train : 3
    write_logs : true


collaborator :
  defaults : plan/defaults/collaborator.yaml
  template : openfl.component.Collaborator
  settings :
    use_delta_updates    : false
    opt_treatment    : RESET

data_loader :
  defaults : plan/defaults/data_loader.yaml
  template : src.dataloader.GaNDLFDataLoader

task_runner :
  template : openfl.federated.task.runner_gandlf.GaNDLFTaskRunner
  settings :
    train_csv           : seg_test_train.csv
    val_csv             : seg_test_val.csv
    device              : cpu
    gandlf_config  :
      batch_size: 1
      clip_grad: null
      clip_mode: null
      data_augmentation: {}
      data_postprocessing: {}
      data_preprocessing:
        normalize: null
      enable_padding: false
      in_memory: true
      inference_mechanism  :
        grid_aggregator_overlap: crop
        patch_overlap: 0
      learning_rate: 0.001
      loss_function: dc
      medcam_enabled: false
      output_dir: '.'
      metrics:
      - dice
      model:
        amp: true
        architecture: unet
        base_filters: 32
        batch_norm: false
        class_list:
        - 0
        - 1
        dimension: 3
        final_layer: sigmoid
        ignore_label_validation: null
        norm_type: instance
        num_channels: 1
      nested_training:
        testing: -5
        validation: -5
      num_epochs: 1
      optimizer:
        type: adam
      parallel_compute_command: ''
      patch_sampler: uniform
      patch_size:
      - 32
      - 32
      - 32
      patience: 1
      pin_memory_dataloader: false
      print_rgb_label_warning: true
      q_max_length: 1
      q_num_workers: 0
      q_samples_per_volume: 1
      q_verbose: false
      save_output: false
      save_training: false
      scaling_factor: 1
      scheduler:
        type: triangle
      track_memory_usage: false
      verbose: false
      version:
        maximum: 0.0.14
        minimum: 0.0.13
      weighted_loss: true


network :
  defaults : plan/defaults/network.yaml

assigner :
  defaults : plan/defaults/assigner.yaml

tasks :
  aggregated_model_validation:
    function : validate
    kwargs   :
      apply   : global
      metrics :
        - valid_loss
        - valid_dice

  locally_tuned_model_validation:
    function  : validate
    kwargs    :
      apply: local
      metrics :
        - valid_loss
        - valid_dice

  train:
    function : train
    kwargs   :
      metrics     :
      - loss
      - train_dice
      epochs : 1


compression_pipeline :
  defaults : plan/defaults/compression_pipeline.yaml
This command initializes the FL plan and auto populates the fully qualified domain name (FQDN) of the aggregator node. This FQDN is embedded within the FL plan so the collaborator nodes know the address of the externally accessible aggregator server to connect to.
If you have connection issues with the auto populated FQDN in the FL plan, you can do one of the following:
OPTION 1: override the auto populated FQDN value with the
-aflag.$ fx plan initialize -a aggregator-hostname.internal-domain.com
OPTION 2: override the apparent FQDN of the system by setting an FQDN environment variable.
$ export FQDN=x.x.x.x
and initializing the FL plan
$ fx plan initialize
Note
Each workspace may have multiple FL plans and multiple collaborator lists associated with it. Therefore, fx plan initialize has the following optional parameters.
Optional Parameters |
Description |
|---|---|
-p, –plan_config PATH |
Federated Learning plan [default = plan/plan.yaml] |
-c, –cols_config PATH |
Authorized collaborator list [default = plan/cols.yaml] |
-d, –data_config PATH |
The data set/shard configuration file |
STEP 2: Configure the Federation#
The objectives in this step:
Ensure each node in the federation has a valid public key infrastructure (PKI) certificate. See Public Key Infrastructure (PKI) for details on available workflows.
Distribute the workspace from the aggregator node to the other collaborator nodes.
On the Aggregator Node:
Setting Up the Certificate Authority
Change to the path of your workspace:
$ cd WORKSPACE_PATH
Set up the aggregator node as the certificate authority for the federation.
All certificates will be signed by the aggregator node. Follow the instructions and enter the information as prompted. The command will create a simple database file to keep track of all issued certificates.
$ fx workspace certify
Run the aggregator certificate creation command, replacing
AFQDNwith the actual fully qualified domain name (FQDN) for the aggregator node.$ fx aggregator generate-cert-request --fqdn AFQDN
Note
On Linux*, you can discover the FQDN with this command:
$ hostname --all-fqdns | awk '{print $1}'
Note
You can override the apparent FQDN of the system by setting an FQDN environment variable before creating the certificate.
$ export FQDN=x.x.x.x
$ fx aggregator generate-cert-request
If you omit the
--fdqnparameter, thenfxwill automatically use the FQDN of the current node assuming the node has been correctly set with a static address.$ fx aggregator generate-cert-request
Run the aggregator certificate signing command, replacing
AFQDNwith the actual fully qualified domain name (FQDN) for the aggregator node.$ fx aggregator certify
This node now has a signed security certificate as the aggregator for this new federation. You should have the following files.
File Type
Filename
Certificate chain
WORKSPACE.PATH/cert/cert_chain.crt
Aggregator certificate
WORKSPACE.PATH/cert/server/agg_{AFQDN}.crt
Aggregator key
WORKSPACE.PATH/cert/server/agg_{AFQDN}.key
where AFQDN is the fully-qualified domain name of the aggregator node.
Exporting the Workspace
Export the workspace so that it can be imported to the collaborator nodes.
$ fx workspace export
The
exportcommand will archive the current workspace (with azipfile extension) and create a requirements.txt of the current Python*packages in the virtual environment.The next step is to transfer this workspace archive to each collaborator node.
On the Collaborator Node:
Importing the Workspace
Copy the workspace archive from the aggregator node to the collaborator nodes.
Install GaNDLF from sources (if not already).
Import the workspace archive.
$ fx workspace import --archive WORKSPACE.zip
where WORKSPACE.zip is the name of the workspace archive. This will unzip the workspace to the current directory and install the required Python packages within the current virtual environment.
For each test machine you want to run as collaborator nodes, create a collaborator certificate request to be signed by the certificate authority.
Replace
COL_LABELwith the label you assigned to the collaborator. This label does not have to be the FQDN; it can be any unique alphanumeric label.$ fx collaborator generate-cert-request -n {COL_LABEL} -d data/{COL_LABEL}
The creation script will specify the path to the data. In this case, the GaNDLF Data Loader will look for train.csv and valid.csv at the path that’s provided. Before running the experiment, you will need to configure both train.csv and valid.csv manually for each collaborator so that each collaborator has the correct datasets. For example, if the collaborator’s name is one, collaborator one would load data/one/train.csv and data/one/valid.csv at experiment runtime, and collaborator two would load data/two/train.csv and data/two/valid.csv.
This command will also create the following files:
File Type
Filename
Collaborator CSR
WORKSPACE.PATH/cert/client/col_{COL_LABEL}.csr
Collaborator key
WORKSPACE.PATH/cert/client/col_{COL_LABEL}.key
Collaborator CSR Package
WORKSPACE.PATH/col_{COL_LABEL}_to_agg_cert_request.zip
Copy/scp the WORKSPACE.PATH/col_{COL_LABEL}_to_agg_cert_request.zip file to the aggregator node (or local workspace if using the same system)
$ scp WORKSPACE.PATH/col_{COL_LABEL}_to_agg_cert_request.zip AGGREGATOR_NODE:WORKSPACE_PATH/
On the aggregator node (i.e., the certificate authority in this example), sign the Collaborator CSR Package from the collaborator nodes.
$ fx collaborator certify --request-pkg /PATH/TO/col_{COL_LABEL}_to_agg_cert_request.zip
where
/PATH/TO/col_{COL_LABEL}_to_agg_cert_request.zipis the path to the Collaborator CSR Package containing the.csrfile from the collaborator node. The certificate authority will sign this certificate for use in the federation.The command packages the signed collaborator certificate, along with the cert_chain.crt file needed to verify certificate signatures, for transport back to the collaborator node:
File Type
Filename
Certificate and Chain Package
WORKSPACE.PATH/agg_to_col_{COL_LABEL}_signed_cert.zip
Copy/scp the WORKSPACE.PATH/agg_to_col_{COL_LABEL}_signed_cert.zip file to the collaborator node (or local workspace if using the same system)
$ scp WORKSPACE.PATH/agg_to_col_{COL_LABEL}_signed_cert.zip COLLABORATOR_NODE:WORKSPACE_PATH/
On the collaborator node, import the signed certificate and certificate chain into your workspace.
$ fx collaborator certify --import /PATH/TO/agg_to_col_{COL_LABEL}_signed_cert.zip
STEP 3: Start the Federation#
On the Aggregator Node:
Start the Aggregator.
$ fx aggregator start
Now, the Aggregator is running and waiting for Collaborators to connect.
On the Collaborator Nodes:
Open a new terminal, change the directory to the workspace, and activate the virtual environment.
Test the connectivity with the Aggregator.
$ fx collaborator ping -n {COLLABORATOR_LABEL}
where
COLLABORATOR_LABELis the label for this Collaborator.Note
Each workspace may have multiple FL plans and multiple collaborator lists associated with it. Therefore, the
fx collaborator startandfx collaborator pingcommands have the following optional parameters:Optional Parameters
Description
-p, –plan_config PATH
Federated Learning plan [default = plan/plan.yaml]
-d, –data_config PATH
The data set/shard configuration file
Run the Collaborator.
$ fx collaborator start -n {COLLABORATOR_LABEL}
where
COLLABORATOR_LABELis the label for this Collaborator.Repeat the earlier steps for each collaborator node in the federation.
When all of the Collaborators connect, the Aggregator starts training. You will see log messages describing the progress of the federated training.
When the last round of training is completed, the Aggregator stores the final weights in the protobuf file that was specified in the YAML file, which in this example is located at save/${WORKSPACE_TEMPLATE}_latest.pbuf.
Post Experiment#
Experiment owners may access the final model in its native format. Once the model has been converted to its native format, inference can be done using GaNDLF’s inference API. Among other training artifacts, the aggregator creates the last and best aggregated (highest validation score) model snapshots. One may convert a snapshot to the native format and save the model to disk by calling the following command from the workspace:
$ fx model save -i model_protobuf_path.pth -o save_model_path
In order for this command to succeed, the TaskRunner used in the experiment must implement a save_native() method.
Another way to access the trained model is by calling the API command directly from a Python script:
from openfl import get_model
model = get_model(plan_config, cols_config, data_config, model_protobuf_path)
In fact, the get_model() method returns a TaskRunner object loaded with the chosen model snapshot. Users may utilize the linked model as a regular Python object.
Running Inference with GaNDLF#
Now that you have generated the final federated model in pytorch format, you can use the model by following the GaNDLF inference instructions