TaskRunner API#
This is a deep dive into the TaskRunner API. To gain familiarity with this API, we recommend going through the quickstart guide. Note that the quickstart guide is focused on simulating an experiment locally. The design choices of this API are best understood when transitioning from a local experiment to a distributed federation, which is how real-world federated learning experiments are conducted.
The Task Runner API uses short-lived components in a federation, which are terminated once the experiment finishes. These components are:
The
Collaboratoruses a local dataset to train a global model and theAggregatorreceives model updates fromCollaborators and aggregates them to create the new global model.The
Aggregatoris framework-agnostic, while theCollaboratorcan use any deep learning frameworks, such as TensorFlow* or PyTorch*.
For this workflow, one needs modify the federation workspace to their requirements by editing the Federated Learning plan (FL plan) along with the Python* code that defines the model and the data loader. The FL plan is a YAML file that defines the collaborators, aggregator, connections, models, data, and any other parameters that describe the training.
Federated Learning Plan (FL Plan) Settings#
Note
Use the Federated Learning plan (FL plan) to modify the federation workspace to your requirements in an aggregator-based workflow.
In order for participants to agree to take part in an experiment, everyone should know ahead of time both what code is going to run on their infrastructure and exactly what information on their system will be accessed. The federated learning (FL) plan aims to capture all of this information needed to decide whether to participate in an experiment, in addition to runtime details needed to load the code and make remote connections. The FL plan is described by the plan.yaml file located in the plan directory of the workspace.
Configurable Settings#
Aggregatoropenfl.component.Aggregator Defines the settings for the aggregator which is the model-owner in the experiment. While models can be trained from scratch, in many cases the federation performs fine-tuning of a previously trained model. For this reason, pre-trained weights for the model are stored in protobuf files on the aggregator node and passed to collaborator nodes during initialization. The settings for aggregator include:
init_state_path: (str:path) Defines the weight protobuf file path where the experiment’s initial weights will be loaded from. These weights will be generated with the fx plan initialize command.
best_state_path: (str:path) Defines the weight protobuf file path that will be saved to for the highest accuracy model during the experiment.
last_state_path: (str:path) Defines the weight protobuf file path that will be saved to during the last round completed in each experiment.
rounds_to_train: (int) Specifies the number of rounds in a federation. A federated learning round is defined as one complete iteration when the collaborators train the model and send the updated model weights back to the aggregator to form a new global model. Within a round, collaborators can train the model for multiple iterations called epochs.
write_logs: (boolean) Metric logging callback feature. By default, logging is done through tensorboard but users can also use custom metric logging function for each task.
persist_checkpoint: (boolean) Specifies whether to enable the storage of a persistent checkpoint in non-volatile storage for recovery purposes. When enabled, the aggregator will restore its state to what it was prior to the restart, ensuring continuity after a restart.
persistent_db_path: (str:path) Defines the persisted database path.
save_native_model: (boolean): Only applicable for tasks involving federated training, this is ignored for federated evaluation. If set, the model is saved in the framework native format at the end of the experiment. Saving methods are defined for each framework undersave_nativefunction of the respective supported framework plugins.
Collaboratoropenfl.component.Collaborator Defines the settings for the collaborator which is the data owner in the experiment. The settings for collaborator include:
use_delta_updates: (boolean) Determines whether the difference in model weights between the current and previous round will be sent (True), or if whole checkpoints will be sent (False). Setting to use_delta_updates to True leads to higher sparsity in model weights sent across, which may improve compression ratios.
opt_treatment: (str) Defines the optimizer state treatment policy. Valid options are : ‘RESET’ - reinitialize optimizer for every round (default), ‘CONTINUE_LOCAL’ - keep local optimizer state for every round, ‘CONTINUE_GLOBAL’ - aggregate optimizer state for every round.
Data Loaderopenfl.federated.data.loader.DataLoader Defines the data loader class that provides access to local dataset. It implements a train loader and a validation loader that takes in the train dataset and the validation dataset respectively. The settings for the dataloader include:
collaborator_count: (int) The number of collaborators participating in the federation
data_group_name: (str) The name of the dataset
batch_size: (int) The size of the training or validation batch
Task Runneropenfl.federated.task.runner.TaskRunner Defines the model, training/validation functions, and how to extract and set the tensors from model weights and optimizer dictionary. Depending on different AI frameworks like PyTorch and Tensorflow, users can select pre-defined task runner methods.
Assigneropenfl.component.Assigner Defines the task that are sent to the collaborators from the aggregator. There are three default tasks that could be given to each Collaborator:
aggregated_model_validation: (str) Perform validation on aggregated global model sent by the aggregator.
train: (str) Perform training on the global model.
locally_tuned_model_validation: (str) Perform validation on the model that was locally trained by the collaborator.
Each YAML top-level section contains the following subsections:
template: The name of the class including top-level packages names. An instance of this class is created when the plan gets initialized.settings: The arguments that are passed to the class constructor.defaults: The file that contains default settings for this subsection. Any setting from defaults file can be overridden in the plan.yaml file.
The following is an example of a plan.yaml:
# Copyright (C) 2020-2024 Intel Corporation
# Licensed subject to the terms of the separately executed evaluation license agreement between Intel Corporation and you.

aggregator:
  settings:
    best_state_path: save/best.pbuf
    db_store_rounds: 2
    init_state_path: save/init.pbuf
    last_state_path: save/last.pbuf
    rounds_to_train: 2
    write_logs: false
  template: openfl.component.aggregator.Aggregator
  defaults : plan/defaults/aggregator.yaml
assigner :
  defaults : plan/defaults/assigner.yaml
collaborator:
  settings:
    db_store_rounds: 1
    use_delta_updates: false
    opt_treatment: RESET
  template: openfl.component.collaborator.Collaborator
compression_pipeline:
  settings: {}
  template: openfl.pipelines.NoCompressionPipeline
data_loader:
  settings:
    batch_size: 64
    collaborator_count: 2
  template: src.dataloader.PyTorchMNISTInMemory
network:
  defaults: plan/defaults/network.yaml
task_runner:
  settings: {}
  template: src.taskrunner.TemplateTaskRunner
tasks:
  aggregated_model_validation:
    function: validate_task
    kwargs:
      apply: global
      metrics:
      - acc
  locally_tuned_model_validation:
    function: validate_task
    kwargs:
      apply: local
      metrics:
      - acc
  settings: {}
  train:
    function: train_task
    kwargs:
      epochs: 1
      metrics:
      - loss
Tasks#
Each task subsection contains the following:
function: The function name to call. The function must be the one defined inTaskRunnerclass.kwargs: kwargs passed to thefunction.
Note
See an example of the TaskRunner class for details.
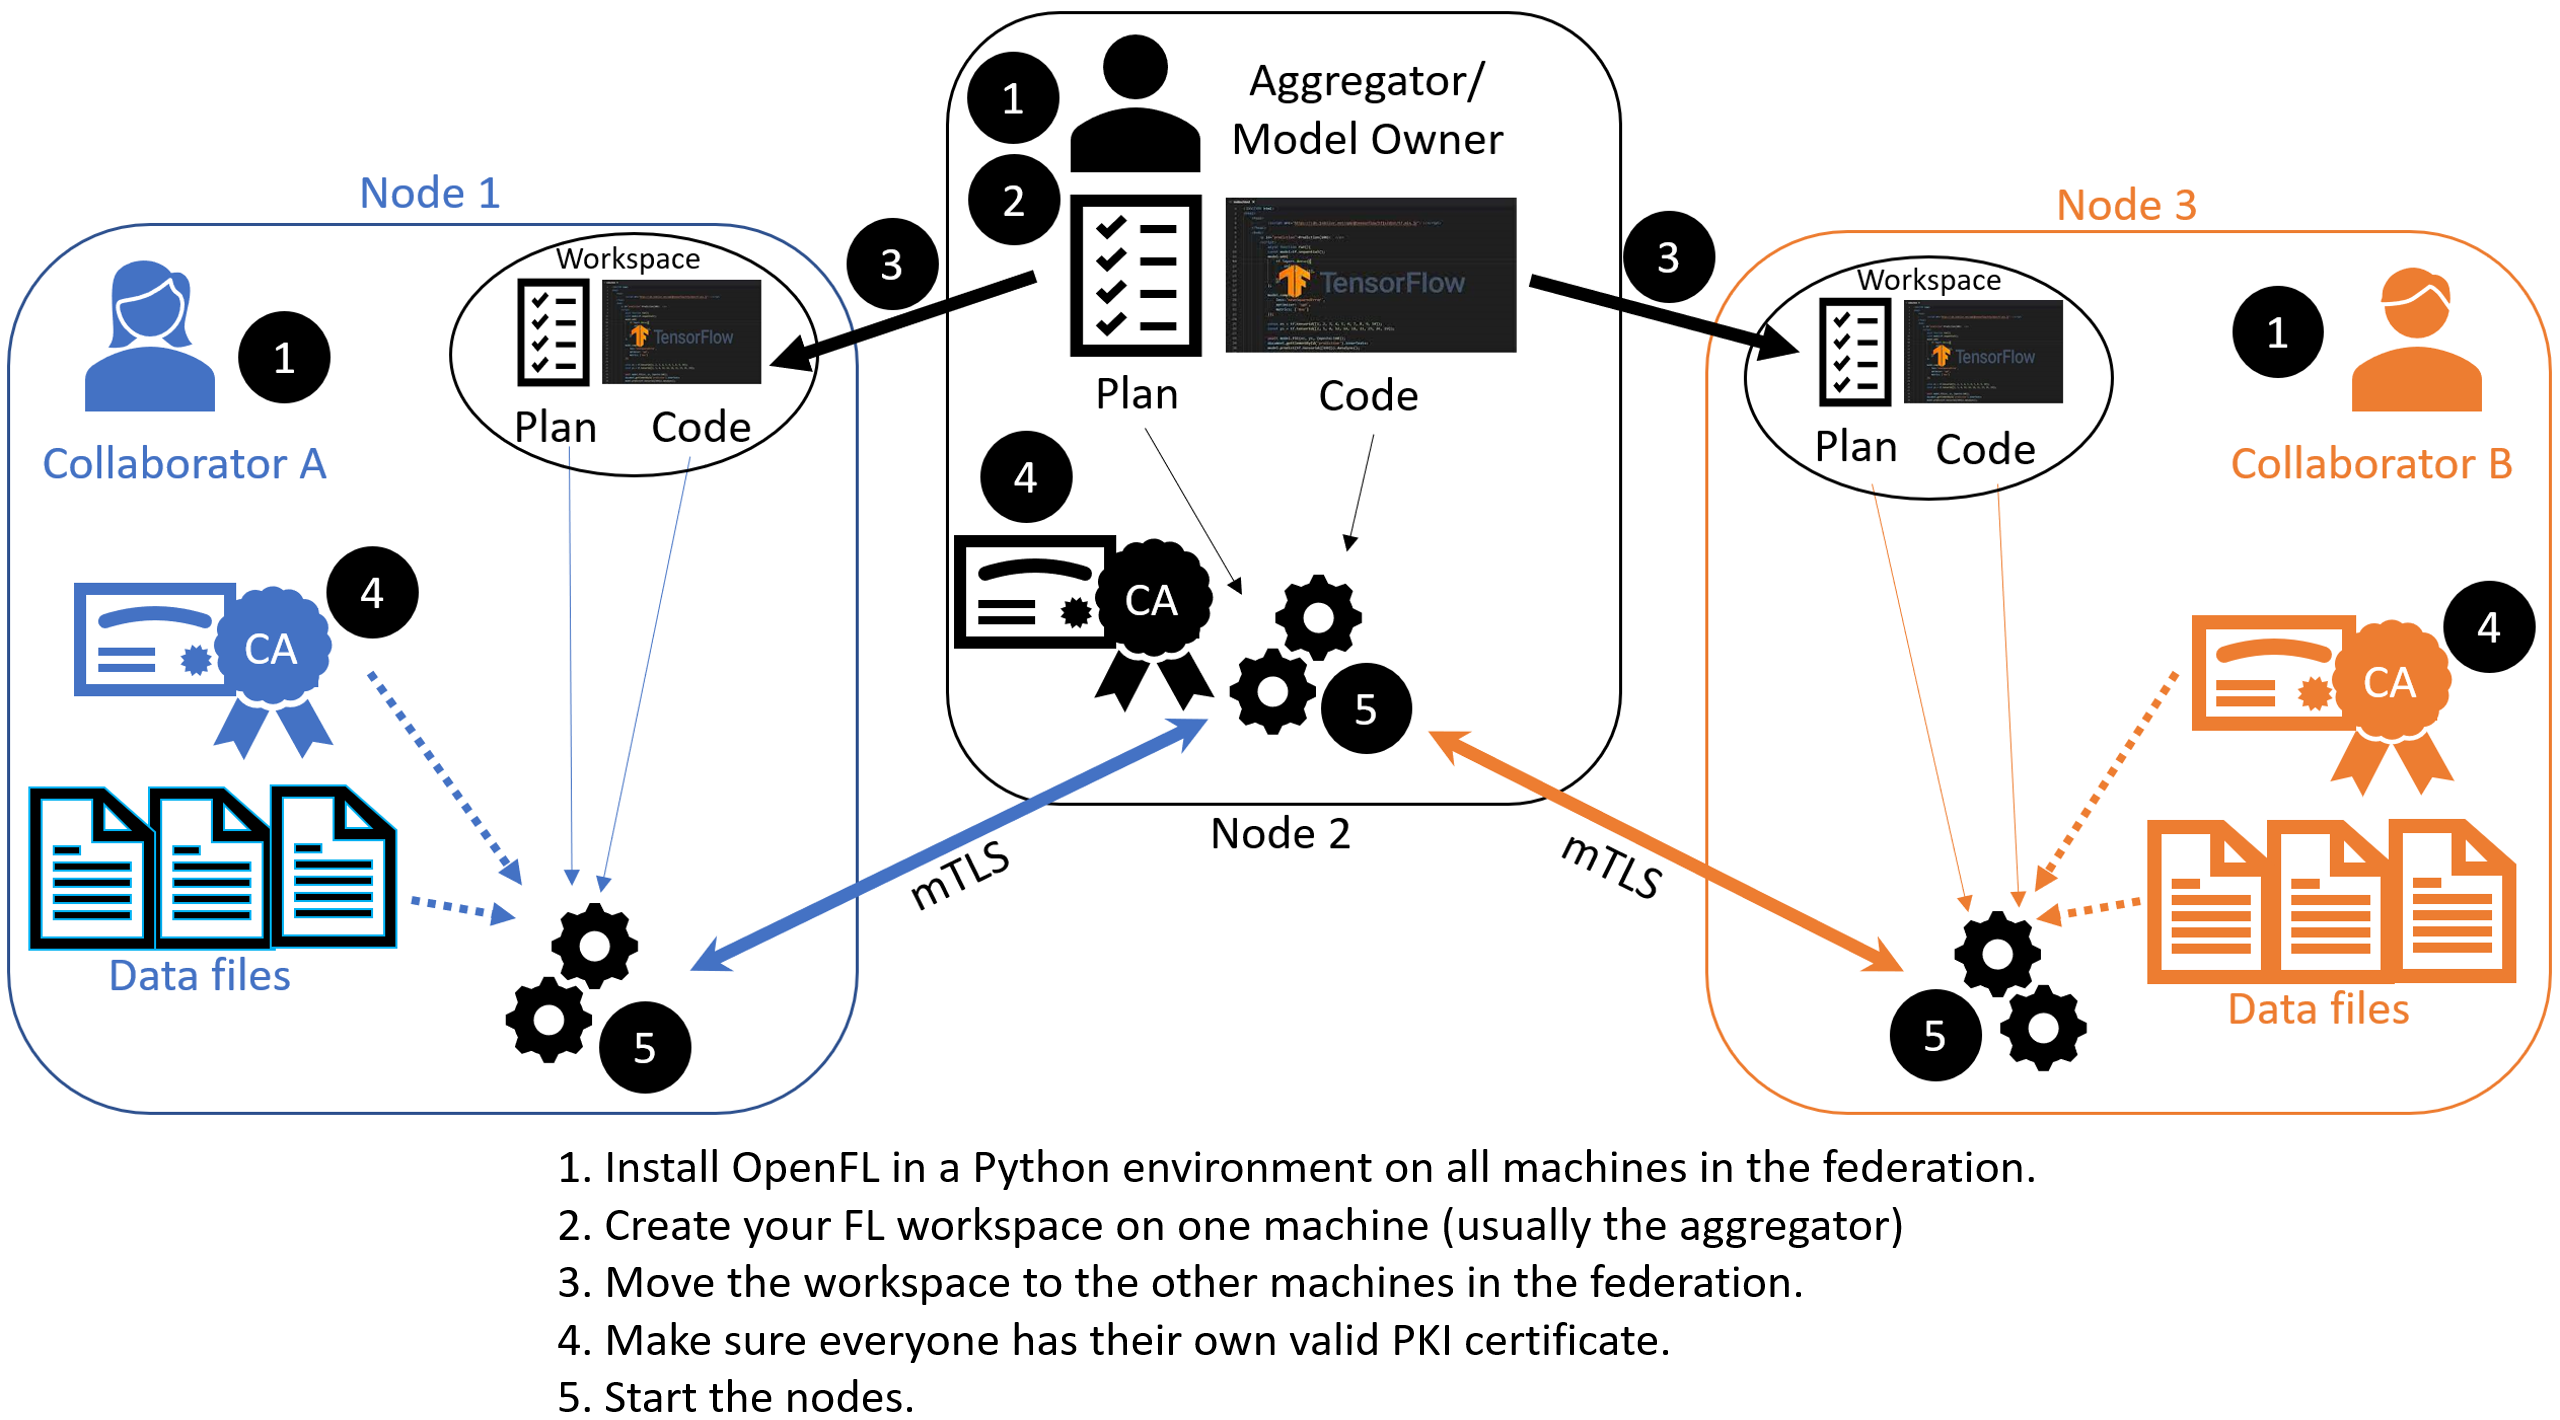
Bare Metal Approach#
Note
Ensure you have installed the OpenFL package on every node (aggregator and collaborators) in the federation.
See Installation for details.
Creates a federated learning workspace on one of the nodes.
STEP 2: Configure the Federation
Ensures each node in the federation has a valid public key infrastructure (PKI) certificate.
Distributes the workspace from the aggregator node to the other collaborator nodes.
STEP 1: Create a Workspace#
Start a Python 3.10 (>=3.10, <3.13) virtual environment and confirm OpenFL is available.
$ fxThis example uses the
keras/mnisttemplate.Set the environment variables to use the
keras/mnistas the template and${HOME}/my_federationas the path to the workspace directory.
$ export WORKSPACE_TEMPLATE=keras/mnist
$ export WORKSPACE_PATH=${HOME}/my_federation
Decide a workspace template, which are end-to-end federated learning training demonstrations. The following is a sample of available templates:
keras/mnist: a workspace with a simple Keras CNN model that will download the MNIST dataset and train in a federation.
tf_2dunet: a workspace with a simple TensorFlow CNN model that will use the BraTS dataset and train in a federation.
tf_cnn_histology: a workspace with a simple TensorFlow CNN model that will download the Colorectal Histology dataset and train in a federation.
keras/histology: a workspace with a simple PyTorch CNN model that will download the Colorectal Histology dataset and train in a federation.
torch/mnist: a workspace with a simple PyTorch CNN model that will download the MNIST dataset and train in a federation.
keras/jax/mnist: a workspace with a simple Keras CNN model that will download the MNIST dataset and train in a federation with jax as backend. You can export the environment variable KERAS_BACKEND to configure your backend. Available backend options are: “jax”, “tensorflow”, “torch”. Example:$ export KERAS_BACKEND="jax"
Note
Please ensure KERAS_BACKEND is set in the environment where you plan on using OpenFL before executing any fx command. Note that Keras is supported only up to Python 3.11. Therefore, please use Python 3.10 or 3.11 for Keras-related workspaces.
See the complete list of available templates.
$ fx workspace create --prefix ${WORKSPACE_PATH}
Create a workspace directory for the new federation project.
$ fx workspace create --prefix ${WORKSPACE_PATH} --template ${WORKSPACE_TEMPLATE}
Note
You can use your own models by overwriting the Python scripts in the src subdirectory in the workspace directory.
Change to the workspace directory.
$ cd ${WORKSPACE_PATH}
Install the workspace requirements:
$ pip install -r requirements.txt
Create an initial set of random model weights.
Note
While models can be trained from scratch, in many cases the federation performs fine-tuning of a previously trained model. For this reason, pre-trained weights for the model are stored in protobuf files on the aggregator node and passed to collaborator nodes during initialization.
The protobuf file with the initial weights is found in ${WORKSPACE_TEMPLATE}_init.pbuf.
$ fx plan initializeThis command initializes the FL plan and auto populates the fully qualified domain name (FQDN) of the aggregator node. This FQDN is embedded within the FL plan so the collaborator nodes know the address of the externally accessible aggregator server to connect to.
If you have connection issues with the auto populated FQDN in the FL plan, you can do one of the following:
OPTION 1: override the auto populated FQDN value with the
-aflag.$ fx plan initialize -a aggregator-hostname.internal-domain.comOPTION 2: override the apparent FQDN of the system by setting an FQDN environment variable.
$ export FQDN=x.x.x.xand initializing the FL plan
$ fx plan initialize
Note
Each workspace may have multiple FL plans and multiple collaborator lists associated with it. Therefore, fx plan initialize has the following optional parameters.
Optional Parameters |
Description |
|---|---|
-p, –plan_config PATH |
Federated Learning plan [default = plan/plan.yaml] |
-c, –cols_config PATH |
Authorized collaborator list [default = plan/cols.yaml] |
-d, –data_config PATH |
The data set/shard configuration file |
STEP 2: Configure the Federation#
The objectives in this step:
Ensure each node in the federation has a valid public key infrastructure (PKI) certificate. See Public Key Infrastructure (PKI) for details on available workflows.
Distribute the workspace from the aggregator node to the other collaborator nodes.
On the Aggregator Node:
Setting Up the Certificate Authority
Change to the path of your workspace:
$ cd WORKSPACE_PATH
Set up the aggregator node as the certificate authority for the federation.
All certificates will be signed by the aggregator node. Follow the instructions and enter the information as prompted. The command will create a simple database file to keep track of all issued certificates.
$ fx workspace certify
Run the aggregator certificate creation command, replacing
AFQDNwith the actual fully qualified domain name (FQDN) for the aggregator node.$ fx aggregator generate-cert-request --fqdn AFQDN
Note
On Linux*, you can discover the FQDN with this command:
$ hostname --all-fqdns | awk '{print $1}'
Note
You can override the apparent FQDN by setting it explicitly via the
--fqdnparameter.$ fx aggregator generate-cert-request --fqdn AFQDN
If you omit the
--fdqnparameter, thenfxwill automatically use the FQDN of the current node assuming the node has been correctly set with a static address.$ fx aggregator generate-cert-request
Run the aggregator certificate signing command, replacing
AFQDNwith the actual fully qualified domain name (FQDN) for the aggregator node.$ fx aggregator certify --fqdn AFQDN
Note
You can override the apparent FQDN of the system by setting an FQDN environment variable (
export FQDN=AFQDN) before signing the certificate.$ fx aggregator certify --fqdn AFQDN
This node now has a signed security certificate as the aggregator for this new federation. You should have the following files.
File Type
Filename
Certificate chain
WORKSPACE.PATH/cert/cert_chain.crt
Aggregator certificate
WORKSPACE.PATH/cert/server/agg_{AFQDN}.crt
Aggregator key
WORKSPACE.PATH/cert/server/agg_{AFQDN}.key
where AFQDN is the fully-qualified domain name of the aggregator node.
Exporting the Workspace
Export the workspace so that it can be imported to the collaborator nodes.
$ fx workspace export
The
exportcommand will archive the current workspace (with azipfile extension) and create a requirements.txt of the current Python*packages in the virtual environment.The next step is to transfer this workspace archive to each collaborator node.
On the Collaborator Node:
Importing the Workspace
Copy the workspace archive from the aggregator node to the collaborator nodes.
Import the workspace archive.
$ fx workspace import --archive WORKSPACE.zip
where WORKSPACE.zip is the name of the workspace archive. This will unzip the workspace to the current directory and install the required Python packages within the current virtual environment.
For each test machine you want to run as collaborator nodes, create a collaborator certificate request to be signed by the certificate authority.
Replace
COL_LABELwith the label you assigned to the collaborator. This label does not have to be the FQDN; it can be any unique alphanumeric label.$ fx collaborator create -n {COL_LABEL} -d {DATA_PATH:optional} $ fx collaborator generate-cert-request -n {COL_LABEL}The creation script will also ask you to specify the path to the data. For this example, enter the integer that represents which MNIST shard to use on this collaborator node. For the first collaborator node enter 1. For the second collaborator node enter 2.
This will create the following files:
File Type
Filename
Collaborator CSR
WORKSPACE.PATH/cert/client/col_{COL_LABEL}.csr
Collaborator key
WORKSPACE.PATH/cert/client/col_{COL_LABEL}.key
Collaborator CSR Package
WORKSPACE.PATH/col_{COL_LABEL}_to_agg_cert_request.zip
On the aggregator node (i.e., the certificate authority in this example), sign the Collaborator CSR Package from the collaborator nodes.
$ fx collaborator certify --request-pkg /PATH/TO/col_{COL_LABEL}_to_agg_cert_request.zip
where
/PATH/TO/col_{COL_LABEL}_to_agg_cert_request.zipis the path to the Collaborator CSR Package containing the.csrfile from the collaborator node. The certificate authority will sign this certificate for use in the federation.The command packages the signed collaborator certificate, along with the cert_chain.crt file needed to verify certificate signatures, for transport back to the collaborator node:
File Type
Filename
Certificate and Chain Package
WORKSPACE.PATH/agg_to_col_{COL_LABEL}_signed_cert.zip
On the collaborator node, import the signed certificate and certificate chain into your workspace.
$ fx collaborator certify --import /PATH/TO/agg_to_col_{COL_LABEL}_signed_cert.zip
STEP 3: Start the Federation#
On the Aggregator Node:
Start the Aggregator.
$ fx aggregator start
Now, the Aggregator is running and waiting for Collaborators to connect.
On the Collaborator Nodes:
Open a new terminal, change the directory to the workspace, and activate the virtual environment.
Test the connectivity with the Aggregator.
$ fx collaborator ping -n {COLLABORATOR_LABEL}
where
COLLABORATOR_LABELis the label for this Collaborator.Note
Each workspace may have multiple FL plans and multiple collaborator lists associated with it. Therefore, the
fx collaborator startandfx collaborator pingcommands have the following optional parameters:Optional Parameters
Description
-p, –plan_config PATH
Federated Learning plan [default = plan/plan.yaml]
-d, –data_config PATH
The data set/shard configuration file
Run the Collaborator.
$ fx collaborator start -n {COLLABORATOR_LABEL}
where
COLLABORATOR_LABELis the label for this Collaborator.Repeat the earlier steps for each collaborator node in the federation.
When all of the Collaborators connect, the Aggregator starts training. You will see log messages describing the progress of the federated training.
When the last round of training is completed, the Aggregator stores the final weights in the protobuf file that was specified in the YAML file, which in this example is located at save/${WORKSPACE_TEMPLATE}_latest.pbuf.
Post Experiment#
Experiment owners may access the final model in its native format. Among other training artifacts, the aggregator creates the last and best aggregated (highest validation score) model snapshots. One may convert a snapshot to the native format and save the model to disk by calling the following command from the workspace:
$ fx model save -i model_protobuf_path.pth -o save_model_path
In order for this command to succeed, the TaskRunner used in the experiment must implement a save_native() method.
Another way to access the trained model is by calling the API command directly from a Python script:
from openfl import get_model
model = get_model(plan_config, cols_config, data_config, model_protobuf_path)
In fact, the get_model() method returns a TaskRunner object loaded with the chosen model snapshot. Users may utilize the linked model as a regular Python object.
Docker Container Approach#
Participants can run experiments within a container either for simulation or to deploy real-world experiments within Trusted Execution Environments (TEEs).
Base Image#
To develop or simulate experiments within a container, OpenFL base image is required.
# Pull latest stable base image
$ docker pull ghcr.io/securefederatedai/openfl:latest

# Or, build a base image from the latest source code
$ docker build . -t openfl -f Dockerfile.base \
    --build-arg OPENFL_REVISION=https://github.com/securefederatedai/openfl.git@develop
Verify:
user@vm:~/openfl$ docker run -it --rm ghcr.io/securefederatedai/openfl:latest bash
user@7b40624c207a:/$ fx
 OpenFL - Open Federated Learning

 BASH COMPLETE ACTIVATION

 Run in terminal:
     _FX_COMPLETE=bash_source fx > ~/.fx-autocomplete.sh
     source ~/.fx-autocomplete.sh
 If ~/.fx-autocomplete.sh already exists:
     source ~/.fx-autocomplete.sh

 CORRECT USAGE

 fx [options] [command] [subcommand] [args]
Building a workspace image#
OpenFL supports Gramine-based TEEs that run within SGX.
To build a TEE-ready workspace image, run the following command from an existing workspace directory. Ensure PKI setup and plan confirmations are done before this step.
This command builds the base image and a TEE-ready workspace image.
Refer to fx workspace dockerize --help for more details.
A signed Docker image named example_workspace.tar will be saved in the workspace. This image (along with respective PKI certificates that are not included in the image) can be shared across participating entities.
Running without a TEE#
Using the native fx command within the image will run the experiment without TEEs.
# Aggregator
docker run --rm \
  --network host \
  --mount type=bind,source=./certs.tar,target=/certs.tar \
  example_workspace bash -c "fx aggregator start ..."

# Collaborator(s)
docker run --rm \
  --network host \
  --mount type=bind,source=./certs.tar,target=/certs.tar \
  example_workspace bash -c "fx collaborator start ..."
Running within a TEE#
To run fx within a TEE, mount the SGX device and AESMD volumes. In addition, prefix the fx command with the gramine-sgx directive.
# Aggregator
docker run --rm \
  --network host \
  --device=/dev/sgx_enclave \
  -v /var/run/aesmd/aesm.socket:/var/run/aesmd/aesm.socket \
  --mount type=bind,source=./certs.tar,target=/certs.tar \
  example_workspace bash -c "gramine-sgx fx aggregator start ..."

# Collaborator(s)
docker run --rm \
  --network host \
  --device=/dev/sgx_enclave \
  -v /var/run/aesmd/aesm.socket:/var/run/aesmd/aesm.socket \
  --mount type=bind,source=./certs.tar,target=/certs.tar \
  example_workspace bash -c "gramine-sgx fx collaborator start ..."
Running OpenFL Container in Production#
For running TaskRunner API in a production environment with enhanced security, use the following parameters to limit CPU, memory, and process IDs, and to prevent privilege escalation:
Example Command:
docker run --rm --name <Aggregator/Collaborator> --network openfl \
  -v $WORKING_DIRECTORY:/workdir-openfl \
  --cpus="0.1" \
  --memory="512m" \
  --pids-limit 100 \
  --security-opt no-new-privileges \
  openfl:latest
Parameters:
--cpus="0.1": Limits the container to 10% of a single CPU core.
--memory="512m": Limits the container to 512MB of memory.
--pids-limit 100: Limits the number of processes to 100.
--security-opt no-new-privileges: Prevents the container from gaining additional privileges.
These settings help ensure that your containerized application runs securely and efficiently in a production environment.
Note: The numbers suggested here are examples/minimal suggestions and need to be adjusted according to the environment and the type of experiments you are aiming to run.